Canyoneering Route Description
South Guardian Angel Canyon (aka SGA) - 4A IV (V)
Zion National Park, Utah
10-23-15, 3 people, 1 Day (Travel time in route 20.5 hours)
 (Full descent but bypassing about 600 feet of canyon).
06-12-16, 4 people, 1 Day (Travel time in route 19.25 hours)
(Full descent)
Time Required - 17 to 20 hours
Distance - 8.8 miles Total, 0.7 miles Technical
Rappels - 11 Rappels, Longest Rappel 305 feet.
Longest rap could be longer if anchor webbing not extended, see general
comments below.
Elevation Range - 4660 - 6500 Feet
Shuttle Required - Yes 7.6 Miles Vehicle - Passenger
Permit Required - Yes
Rappelling and anchor gear, Ropes and or pull cords for rappels up
to 305 feet and 80 feet of 1 inch webbing for sling placement.
Note that the final rappel needs to have anchor webbing extended to
the lip for it to be only 305 feet. If you do not extend the
anchor webbing, you will need a longer rope.
South Guardian Angel Canyon (SGA) started out as curiosity
staring at Google Earth which later led to three epic adventures. A scout
trip, a descent of the canyon where we bypassed a portion, then later a full
descent.
While I have this route labeled as a IV, it may be best
as an overnight trip? But if you like LONG days then this makes for a
great single day route. If you are fast on a single day trip or if you
are doing this as an overnight, you can take an hour or 2 and go up to the
peak of South Guardian Angel Peak before dropping down into the canyon. The
detour to the peak of South Guardian Angel is about 0.4 miles with about 650
feet of elevation gain and then back down for a round trip total of 0.8
miles.
The route to South Guardian Angel Canyon (SGA Canyon)
follows an off trail route down into the Subway drainage then climbs up the
other side of the Subway. The route continues off trail to the head of
SGA Canyon, down SGA into the Subway below any of the technical portion of
the Subway. Since the route crosses and partially descends the Subway
drainage, the Zion park service requires a permit for Subway.
SGA is rated a 4 in technical difficulty since a couple
of the anchors require a little extra effort to set, one of the rappels is
very awkward as you stem over a skinny slot and controlled pendulum down
under it to continue rappelling, one traverse to a ledge is a little tricky
and a few other odds and ends. Be prepared to think about your anchors
and how your rope will flow in a few places.
The two deep slots that you rappel down into while in
SGA are unlike anything I have seen yet. Ok so I have rappelled down
into slots before but the scale of the second slot is massive and a real
treat! Rappelling down about 250 feet into a deep crack then finding a
flat sandy bottom that runs for a few hundred feet, simply makes you feel
small when you're in there.
The final rappel is massively tall feeling with most of
it free hanging in a hanging garden / alcove sweeping around you.
Another good reason to enjoy this route if you like such sights.
There is water in the canyon but nothing more than knee
deep so no wetsuits are needed.
Note:
The description and GPS
points in the approach portion of this route description can also be useful
for those just hiking to the South Guardian Angel Peak in Zion National Park
as well. The hike to SGA can be difficult to route find and a GPS
loaded with the points here may keep you on track.
Warning - Dangerous scramble from the
bottom of rap 5.
See the notes below in the route description
for more details. Rap 5 drops part way down a deep crack to a ledge
where you can then scramble up to a large vegetated ledge to walk down
canyon to rap 6 dropping back down into the deep crack. The scramble
up to the larger vegetated ledge is not difficult but is very dangerous.
An unprotected fall would result in sure death. Protecting the first
person up the scramble can be done but a fall would still result in a
serious pendulum like tumble / fall. This spot is dangerous and
possibly lethal rather it is protected or not. Be sure to be aware of
the risks before taking this route.
A bolted anchor here would make this scramble
un-necessary since the rappel can then be done down through the crack.
However there are no bolted hangers here and you will need to exercise
extreme caution.
Warning - Rope Length:
The final rap is 305 feet
from the lip at the top of the drop, IF, the anchor webbing is extended to
the lip of the drop. The anchor is a tree about 20 feet back from the
drop and anchor webbing needs to be extended. If you do not extend the
anchor webbing, you will need more than 305 feet of rope. Of note
there are huge flat ledges on both the RDC and LDC sides at the top of the
final rap. The RDC ledge allows you to lay down and look over the edge
to see the floor below and tell if the rope reaches the bottom.
Warning - Navigation:
The
route to SGA involves route finding in convoluted terrain down into and
crossing the Subway drainage. If you have done the hike to SGA peak
before then you likely know the route and will have an easier time. If
you are unfamiliar with tis route be prepared to put on your skilled
navigator hat and figure it out. GPS is recommended to help keep you
on track or you can try to follow the written approach description here.
I have heard of people getting lost and not finding their way when doing
this route to go to SGA peak so be aware you will need to think through this
one.
To get to the Trailhead
From the South Gate entrance to Zion National Park, drive about
14 miles west on highway 9 to the turn off for Kolob Reservoir (Kolob
Reservoir Road). Drive another 15.6 miles to the Wildcat
Canyon trailhead. Park your car and start your route.
To leave the Exit Vehicle / Escape Pod
From the South Gate to Zion National Park, drive about 14 miles
west on highway 9 to the turn off for Kolob Reservoir (Kolob
Reservoir Road). Drive about 8.2 miles to the Left Fork of
North Creek trailhead. Park the exit vehicle here then
continue up to the Wild Cat Canyon trailhead to begin the route.
Leave a vehicle here as the escape pod.
GPS coordinate information listed at the bottom. For information about waypoint naming and map symbols, refer to the
Glossary page.

Click the links for maps of the route.
Map of the entire route.
Map 1 of approach.
Map 2 of approach.
Map 3 of approach.
Map of the technical section.
Map of the exit.
The Approach:
From the Wildcat Canyon trailhead (tWildCatCyn) follow the trail
about 1 mile to the Northgate peaks trail junction (you will pass
the Hop Valley connector trail junction shortly before the Northgate
junction). Turn right (south) at the junction (jNorthGatePks)
and follow the Northgate
Peaks trail heading
south.
About 1.1 miles the
Northgate peaks trail
will top out in a rocky
section (wSGA-Apr01)
where the trail appears
to fade away. At
this point you will be
between the Northgate
Peaks.
To continue down toward
North Guardian Angel
Peak, The Subway and
South Guardian Angel
Peak / Canyon, look for
the trail turning left
to travel east down the
side of the ridge down
into the drainage on the
left (east). The
trail is not hard to
find if you look for it.
About 400 feet farther
you will be down in a
shallow drainage
(wSGA-Apr02). From
here follow south down
the drainage.
About 400 feet down the
drainage you may find
some use trails going up
out of the drainage
(wSGA-Apr03) to the left
(east). You can go
up the use trails and
intersect with the route
described here.
However following the
use trails down along
the drainage makes for
more simple navigation
and is what is described
here.
Follow south down the
drainage using use
trails that have been
well worn in generally
following the LDC bank
for about 0.2 miles to
where it gives way to
wide open spaces
(wSGA-Apr04).
When you get to the wide
open spaces (wSGA-Apr04)
you can see North
Guardian Angle Peak
about 0.25 miles to the
south. Veer left and
travel southeast about
0.2 miles over to the
base of the low nose of
North Guardian Angel.
When you get to near the
base of North Guardian
Angel (wSGA-Apr05), make
your way east about 400
feet and cross over the
head of a drainage
running down to the
south.
From the head of the
drainage (wSGA-Apr06),
contour around the head
to travel south and
follow the slick rock up
the left (east) side of
the drainage. As you
make your way up the
slickrock slope you will
have a beehive like rock
above you on your left
and the drainage you
went around on your
right.
Follow up the slickrock
for about 450 feet to
where it tops out
(wSGA-Apr07) From this
top out begin traveling
down the slope to the
south. As you descend to
the south veer left
(southeast) and route
find your way over to
the crest of the major
ridge running down
south. You will cross
over a minor drainage as
you get over to the
crest of the ridge.
Note:
This is where navigation
can get very convoluted
and written directions
will help but may fail
to properly convey the
route. A GPS can
be helpful.
Don't forget to take a
moment to enjoy the
incredible views with
South Guardian Angel
Peak about 1.7 miles
away to the southwest
and SGA Canyon dropping
down right from the
middle of South Guardian
Angel.
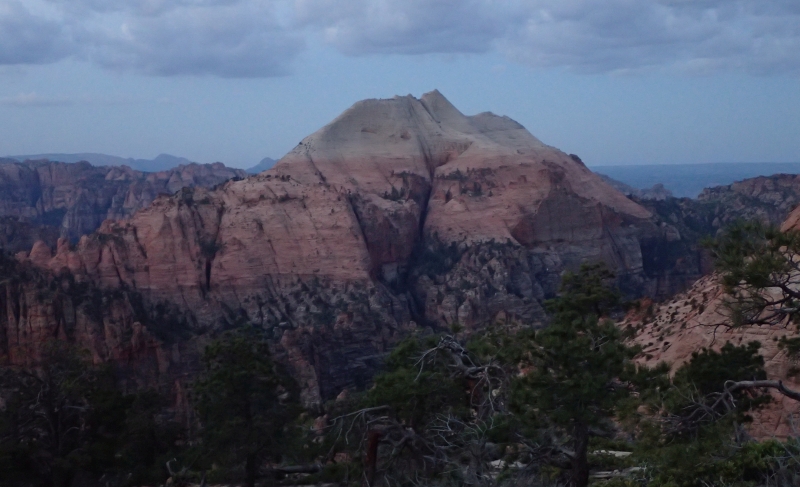 View of South Guardian Angel Peak and South Guardian
Angel Canyon dropping down the center of it.
View of South Guardian Angel Peak and South Guardian
Angel Canyon dropping down the center of it.
About 0.2 miles down the
ridge the route will
pass between two
sandstone hills along
the crest of the ridge
(wSGA-Apr08). Continue
south down the ridge
toward an area with some
hoodoo like features
with black conglomerate
tops.
About 300 feet farther
look for a cairned route
(wSGA-Apr9) dropping
down the left (east)
side leaving the crest
of the ridge you are on
down into a drainage
below and about 270 feet
east. The route is
sometimes well cairned
and is relatively easy
to follow.
Note:
If you do not find the
cairns and continue down
the ridge another 130
feet you will get to a
point along the ridge
with a steep drop off
preventing travel down
the ridge. If this
happens, simply turn
around and go back up
the ridge about 130 feet
looking for a route down
off the ridge to the
drainage to the east.
Once down in the
drainage below the ridge
(wSGA-Apr10), follow
south down the drainage
about 200 feet to where
more cairns mark a route
that contours to the
left (east) out of the
drainage (wSGA-Apr11).
Route find along the
cairned route southeast
about 200 feet to the
next ridge over.
When you get to the next
ridge over (wSGA-Apr12),
route find your way
south down the ridge
about 500 feet to where
the ridge slowly becomes
a wide drainage.
As the ridge turns into
a side drainage
(wSGA-Apr13) follow more
cairns south down the
drainage. Note
that you can not go too
far east here since you
will get to the top of a
huge vertical cliff
overlooking a massive
drainage.
About 150 feet farther
will be the head of a
steep ravine / drainage
(wSGA-Apr14) running
south down toward the
Subway. Travel south
down the ravine toward
the Subway. This ravine
is very steep and has a
few spots to bushwhack
and downclimb over some
minor drops.
About 250 feet down the
steep ravine will be
wide open spaces
(wSGA-Apr15) where there
are some use trails
continuing south over
toward the Subway and
will lead to a cliff
band where you cannot
climb down into the
Subway. Instead of
following the use trails
south, turn left and go
east about 100 feet over
to the top of another
ravine / drainage
(wSGA-Apr16)
From the top of the
final ravine down into
the Subway (wSGA-Apr16)
scramble your way down
for about 100 feet to a
large flat landing. From
that flat landing drop
down to the right into
more ravine and scramble
your way down into the
Subway.
Note:
As you travel down the
ravine from the large
flat landing the rock
wall on the right will
open up a short distance
down where you can turn
hard right and scramble
down a steep dirt path
into the bottom of the
ravine. As soon as the
rock wall subsides make
your way down into the
bottom of the ravine! If
you don't turn right and
instead follow well worn
social trails on a more
gentle slope, you will
find a cliff out and be
forced to backtrack.
At the bottom of the
ravine you will be down
in the Subway (jSubway-SGA).
Walk across to the
ravine on the opposite
side and travel south up
the ravine to get up and
out of The Subway.
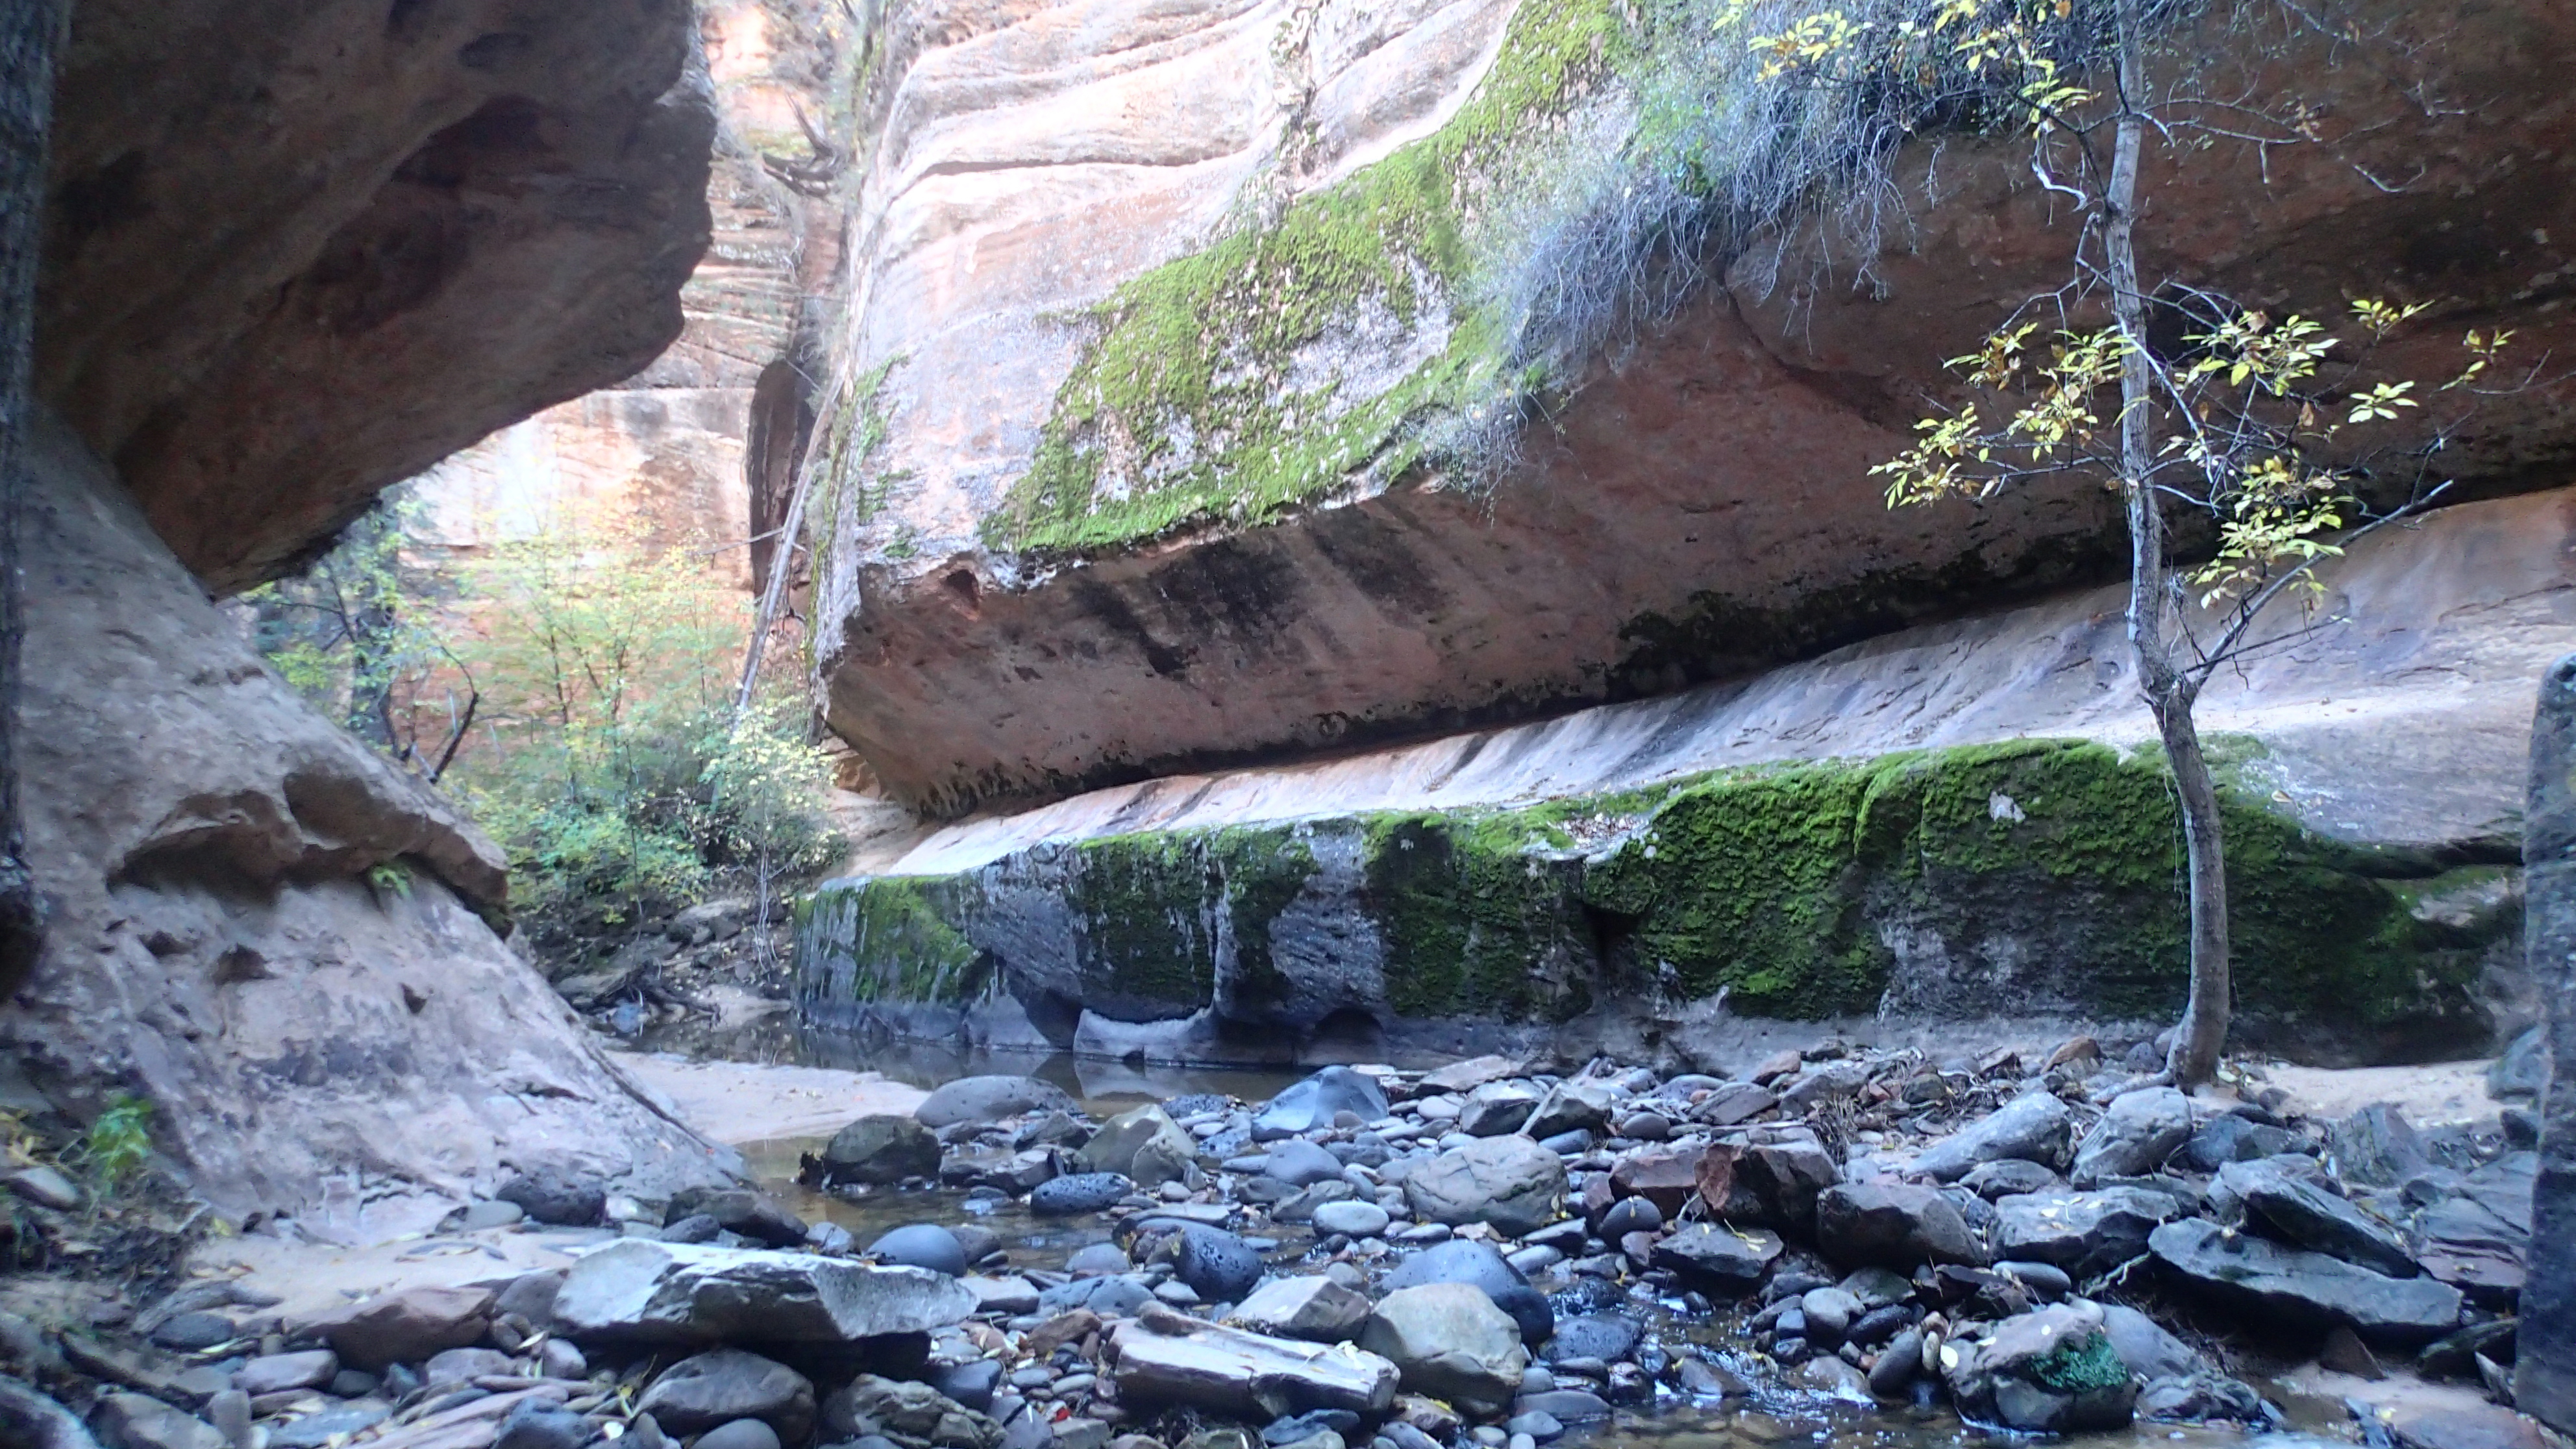 View looking up the Subway to know you are in the correct spot.
As you start south up
the ravine out of the
Subway, do not stay in
the middle of the ravine
which will lead up to
huge boulders you can
not climb up over.
Instead stay on the far
right side of the ravine
to an upclimb about 100
feet up out of The
Subway just after
passing an arch feature.
The upclimb is in two
stages of about 10 feet
then 8 feet with the
second part being a bit
sketchy. After getting
up the upclimb, work
your way back into the
middle of the ravine
above the large
boulders.
A little farther up the
ravine is a fork where
you will want to
continue up the left
fork and scramble your
way up to where you can
get out of the ravine on
the LUC (east) side out
onto dirt slopes with
some use trails forming
(wSGA-Apr17).
Follow those use trails
up about 200 feet with a
couple switchbacks to
the top out (wSGA-Apr18)
at a saddle on the
canyon rim above.
Route find your way
south about 300 feet
down into a sandy wash (jSGA-N.Pole
). Turn left to
walk northeast up the
drainage in wide open
sandy wash with some low
water flow and grasses.
About 330 feet east up
the drainage will be a
fork in the wash
(wSGA-Apr19).
Turn right at the fork
and travel south. Some
sections of the wash
have use trails on the
RUC side that may make
travel a little easier.
About 0.17 miles up the
wash will be a pool to
go around (wSGA-Apr20)
which you may or may not
see depending on if you
are traveling in the
wash or just up out of
it.
Continue south up
the wash or the
occasional use trail for
about 0.6 miles to where
the sandy wash gets to
the bottom of a large
sandstone dryfall
(wSGA-Apr21) of about 30
or 40 feet tall.
Sand wash gets up to the
bottom of a 30 or 40
foot sandstone dryfall.
Scramble your way up the
dryfall or take the
easier route and bypass
on the slopes on the
left (south).
From the top of the
dryfall, route find your
way southwest up the
very wide slickrock
drainage for about 600
feet to where it gets
steeper as you approach
a big vertical wall.
Note that the drainage
is very wide and does
not feel like a distinct
drainage.
Where the slickrock
drainage begins to get
steep (wSGA-Apr22), veer
left (south) and route
find your way up the
steep slickrock about
200 feet to a scramble /
upclimb of about 15 feet
(wSGA-Apr23) near a
small peak. The
upclimb may be a little
awkward with a heavy
pack.
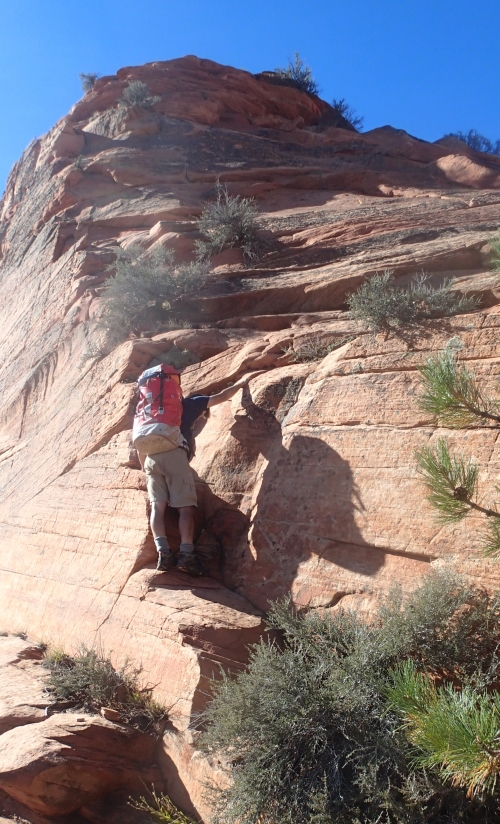 Upclimb on the approach
that may be a little awkward
with a pack on.
Upclimb on the approach
that may be a little awkward
with a pack on.
From the top of the
upclimb contour around
the small peak to
continue west about 150
feet to a small saddle
like area where you can
start to see the peak of
South Guardian Angel.
From the small saddle
like area (wSGA-Apr24)
you can start to see the
peak of South Guardian
Angel. From here route
find your way west
toward South Guardian
Angel contouring around
ridges and bowls where
needed. About 0.25 miles
farther you will be at a
shallow saddle where you
can see the slickrock
ridge leading up South
Guardian Angel (jSGA-Canyon).
From the shallow saddle
(wSGA-Apr24) you can see
the slickrock ridge
leading up to South
Guardian Angel Peak to
the south and you can
also see South Guardian
Angel Canyon down to the
right (west).
The Side Trips:
If you
want to take a side trip
up to South Guardian
Angel Peak you can drop your
gear and make the trip
up which may take an
hour or 2. The
detour to the peak of
South Guardian Angel is
about 0.4 miles with
about 650 feet of
elevation gain and then
back down for a round
trip total of 0.8 miles.
To drop down into SGA
Canyon, leave the
slickrock ridge here and
route find your way
about 1200 feet
southwest to where you
can walk down into the
canyon about 200 feet
below the headwall. You
will need to route find
your way around a couple
drops on the way there.
The Canyoneering / Technical Section:
When you reach the
top of South Guardian
Angel Canyon (ySGATp), you can
walk into the side of
the water course about
200 feet from the head
wall.
Before dropping down SGA
Canyon you can take a
short scramble up the
LDC side just before rap
1 to look over the
entire drainage.
Once up at the side view
area (SGA-SideView) you
have good views over the
canyon and you can see
North Guardian Angel
Peak as well.
Rap 1 (dSGA-R01) is a
little over 100 feet
down canyon, anchored
from a stout bush on the
LDC rim about 40 feet
down canyon of the top
of the drop and drops
about 80 feet down a
narrow crack. Rap 1 may
possibly be downclimbed
but it would be a bad
idea due to an awkward
start to get under a
false floor and the
lower portion being very
slick with moss.
Note - Rap 1
alternate anchor
options:
There is a large pine
tree near the head of
the drop that could be used
but would
place the rope over a
VERY sharp edge.
There are also choke
stones at the top of the
drop but these will
force the rope into
v-slots creating
rope pull issues and
create a very
awkward start.
Right after rap 1 is
another drop of about 35
feet that is bypassed by
climbing down along the
crack and ledge system
on the RDC side. There
are a lot of little
huecos in the rock here
that are interesting to
look at and play in.
Part way down the ledge
system on the RDC side
is a drop of about 6
feet that is pretty
awkward. Providing a
hand line to everyone and
a partner assist here
for the last person
makes this pretty
simple. Although this
drop is a downclimb it
looks like a bad idea
when just looking from
the top. After getting
someone down on rope
they can easily assist
others.
About 50
feet after the downclimb
is rap2.
Rap 2 (dSGA-R02) is
anchored from a large
rock in the wash about
10 feet back from the
drop and drops about 12
feet with a very awkward
start. From the
bottom of rap 2 continue
down a narrow slot with
level floor for about
100 feet to rap 3 where
the floor of the narrow
slot drops out suddenly.
Rap 3 (dSGA-R03) is
anchored from choke
stone and drops about
140 feet with a ledge
about 25 feet from the
bottom into a huge deep
feeling chamber.
The anchor is down on
the floor of the skinny
crack where it is
difficult to get to.
Starting rap 3 is
awkward as you need to
stem out past the false
floor and past more
skinny crack where you
will not fit down
through then rap down
under the false floor
where you need to
pendulum under a little
ways. This start
is made more awkward
since it is skinny
making it difficult to
get you and your pack to
squeeze through. Facing
RDC allows better
features for the stem
out and pendulum under
the top of rap 3. With a
lot of effort and
attention, the pendulum
action can be slow and
controlled.
If this place were to be
bolted one day this
rappel would be a good
candidate for a solid
set of hangers to allow
a rap straight down and
no pendulum action.
Exiting the down canyon
end of the chamber below
rap 3 is done by laying
down on your side and
worming through a narrow
opening at the canyon
floor and pushing your
pack along the canyon
floor for about 6 feet
to get where you can
stand up and walk. There
is one other possible
exit about 8 feet up
where the crack widens
but it would be very
difficult to get up to.
The rest of the crack is
not large enough to
allow exit.
Rap 4 is almost 500 feet
down canyon after the
chamber and is easy wash
walking with one
downclimb of about 6
feet.
Rap 4 (dSGA-R04) is
anchored from logs
wedged about 50 feet
back from the drop and
drops about 25 feet down
a trickling water fall.
Since there are not good
anchors at the top of
rap 4 and you will
anchor about 50 feet
back. A retrievable
anchor like a Smooth
Operator can make the
pull easier and help
reduce rope grooves.
After rap 4 is about 250
feet of easy walking
over to the start of
another deep, dark,
intimidating crack and
rap 5.
Rap 5 (dSGA-R05) is
anchored from a large
pine tree about 65 feet
back from the drop then
drops down sloped slick
rock another 75 feet
down to a small ledge
down in the slot on the
LDC side large enough
for 2 to 3 people.
The small ledge is right
where the crack goes
vertical, deep and dark.
From the small ledge
scramble up a sloped
slickrock ramp to a
large vegetated ledge.
The scramble up is
moderately easy but the
consequences of a fall
will be fatal as you
will fall into the very
deep vertical crack.
BE SURE to belay the
first person up who can
then set a rope on a
nearby tree to assist
everyone else. The
belay for the first
person up can be done
with the rappel rope
from rap 5 but a fall
would result in a
pendulum like fall /
tumble.
WARNING:
This is a tricky spot
and care must be taken.
This spot is dangerous
and careful thought of
how to proceeded is
needed.
Note:
To belay the first
person up the slickrock
ramp a 190 foot rope is
recommended for rap 5.
About 150
feet own to the small
ledge and another 40
feet up the ramp to the
wide vegetated ledge /
shelf.
 This is a tricky spot
where care should be taken
to stay safe.
This is a tricky spot
where care should be taken
to stay safe.
Once up the slickrock
ramp and onto the large
vegetated ledge, walk
down canyon about 180
feet down canyon to a
downclimb of about 6
feet where at the bottom
you can anchor from a
large pine tree for rap
6 down into the slot.
Note:
Another option
would be to rig from a
large tree near the top
of the ramp and drop
down into the slot from
there. Where a 300
foot rope will likely be
more than long enough
for the rappel but this
has not been confirmed.
Also of note if you drop
down the head of the
crack by rappelling here
you will be on the up
canyon side of a pool to
swim at the floor of the
crack. To avoid this
pool use the rappel
station down canyon as
described here.
Rap 6 (dSGA-R06) is
anchored from a large
pine and drops about 240
feet down into the deep
dark crack with a few
ledges along the way. A
partner assistable
downclimb of about 6
feet is just before
getting to the anchor.
Be very careful not to
knock rocks off this
sloped dirt and rock
filled ledge. When
pulling your ropes be
sure to walk a little up
canyon to keep your
ropes from pulling down
onto logs jammed
overhead.
At the bottom of rap 6
is a flat level sandy
floor in the bottom of
the deep dark crack
where you can walk up
canyon about 160 feet to
the lower part of the
vertical head wall of
the crack and walk about
300 feet down canyon to
where the crack starts
to open up and you get
to the next rap. Take
time to enjoy the belly
of this crack as it is a
very unique place since
it is a combination of
water course and deep
fault.
Someone on the trip made
note that they have
never felt so small as
they did when on the
floor of this crack.
I have rappelled into
cracks before but the
scale of this is huge
and does indeed make you
feel tiny. This is
one of the spots that
makes this route so
awesome.
Rap 7 (dSGA-R07) is
anchored LDC from an
arch up on a ledge and
drops about 30 feet down
the LDC wall to avoid a
pool below that would be
a swimmer. Optionally
you can build a deadman
anchor in the sand and
rappel about 16 feet
down the water course to
the pool. Easy
wash walking for about
500 feet to the next
rap.
Rap 8 (dSGA-R08) is
anchored from a large
pine tree about 30 feet
back and drops about 70
feet over some ledges
near the top then goes
free hanging over an
alcove.
About 9 feet after the
rap is a 20 foot drop to
bypass (SGA-Cyn02) on
the LDC side by
traversing along a
sloped dirt bank over
and down to the top of
the next rap.
Rap 9 (dSGA-R09) is
anchored LDC from a pine
tree about 20 feet back
up out of the wash and
drops about 70 feet. The
start to this rap can be
a little awkward as it
starts down a dihedral
and keeping your rope in
the corner as you head
over can be tricky. Easy
walking in sand for
about 180 feet to the
next rap.
Rap 10 (dSGA-R10) is
anchored LDC from a
small pine and drops
about 30 feet down to a
huge ledge in the water
course where the final
rap is.
Rap 11(dSGA-R11) is
anchored from a pine
tree on the RDC side of
the large ledge about 20
feet back and drops
about 305 feet from the
lip. The first 25 feet
is down a wall then the
rap goes free hanging
the rest of the way down
in a huge very scenic
alcove. This is an
amazing view so take
time to enjoy it!
Warning:
Be sure to
extend the the webbing
for the anchor all the
way and slightly over
the lip to ensure an
easier pull and make the
drop only 305 feet. The
rappel starts down a
crack which you can
easily downclimb into
while on rope allowing a
safe way to get down the
start of the rappel with
the anchor webbing
extended slightly over
the lip.
There are big flat
ledges on both sides of
this rappel. The RDC
ledge allows you to
laydown and look over to
see the entire drop and
see if your rope bag is
on the ground.
From the bottom of the
final rap walk down
canyon around a huge
rock and dirt island
with a couple scramble
spots down to the Subway
about 750 feet west.
The Exit:
From the
end of the SGA Canyon
drainage where it meets
the Subway drainage (ySGA-Bt)
turn left and follow
southwest down Left
Fork of North Creek with a mix of trails on the
canyon sides and areas where walking through the water is needed.
About 10.74 miles downstream is a large rock RDC with dinosaur tracks on it
(sDinosaurTrks). Some of the tracks are quite deep and
very clear. The tracks are on a
couple of very large white boulders RDC.
About 1.2 miles down canyon from the dinosaur tracks is the junction for the trail up the side of the
right ( north west) side of the canyon to the exit
vehicle parked at the Left Fork of North Creek trailhead.
The junction for the exit trail is 0.5 miles from where Pine
Spring wash comes in RDC. A sign with a foot step on it
(jFootTrlSgn01) is posted about 225 feet before reaching the
exit trail. From where the exit trail meets the main
canyon wash (jLftFrkNrthCk) the ascent up to the trailhead is up
a steep ravine and soon turns to a steep trail along the hill
side to the top to the Left Fork of North Creek trailhead.
Downloadable GPX files
available at
BG-Gear Store
(easier than manual entry and a great way to support
Bluugnome).
Waypoint naming convention and map symbol information can be found on the Glossary page.
Elevations are approximate.
BEFORE
manually entering coordinates set your system to WGS84 datum and Lat/Lon hddd.ddddd° coordinate format.
Inconsistent datum's and coordinate formats will result in location errors.
Click to show / expand the list of waypoints below........
| SGA 1 - Drive past the Exit then to Trailhead |
- extKolobRes
Lat/Lon (WGS84): N 37.20374
W -113.18604
Elev: NaN Feet
Turn off for Kolob Reservior Raod.
- tLftFrkNrthCk
Lat/Lon (WGS84): N 37.28480
W -113.09576
Elev: 5,070 Feet
Trailhead for the Left Fork of North Creek trail.
- tWildCatCyn
Lat/Lon (WGS84): N 37.33985
W -113.07587
Elev: 6,970 Feet
Wild Cat Canyon Trailhead.
|
| SGA 2 - Approach |
- tWildCatCyn
Lat/Lon (WGS84): N 37.33985
W -113.07587
Elev: 6,970 Feet
Wild Cat Canyon Trailhead.
- jHopVlyCnct
Lat/Lon (WGS84): N 37.33957
W -113.06195
Elev: 6,915 Feet
Junction for the Hop Valley Connector Trail.
- jNorthGatePks
Lat/Lon (WGS84): N 37.34009
W -113.05970
Elev: 6,930 Feet
Junction to the Northgate Peaks trail.
- wSGA-Apr01
Lat/Lon (WGS84): N 37.32571
W -113.05656
Elev: NaN Feet
The Northgate Peaks trail ends about here where you are between the Northgate Peaks out on the end of a ridge with a lot of rock and rubble.
To continue down toward North Guardian Angel Peak, The Subway and South Guardian Angel Peak look for the trail turning left to travel east down the side of the ridge down into the drainage on the left (east).
- wSGA-Apr02
Lat/Lon (WGS84): N 37.32539
W -113.05552
Elev: NaN Feet
Down in a drainge to the left (east) of the end of the Northgate Peaks Trail. To continue toward North Guardian Angle Peak, The Subway and South Guardian Angel Peak follow south down the drainage.
- wSGA-Apr03
Lat/Lon (WGS84): N 37.32436
W -113.05594
Elev: NaN Feet
The route follows down the drainage to the south. Follow south down the drainage using use trails that have been well worn in generally following the LDC bank for about 0.2 miles to where it gives way to wide open spaces.
There are some use trails here leading up out of the drainage on the LDC (east) side. You can follow these trails up the slope then contour around the base of the sandstone hill, but this does not take significant length off the route. It is simpler to stay in the drainage and impacts the area less.
- wSGA-Apr04
Lat/Lon (WGS84): N 37.32178
W -113.05567
Elev: NaN Feet
The drainage gives way to wide open spaces where you can see North Guardian Angle Peak about 0.25 miles to the south. Veer left and travel southeast about 0.2 miles over to the base of the low nose of North Guardian Angel.
- wSGA-Apr05
Lat/Lon (WGS84): N 37.32001
W -113.05391
Elev: NaN Feet
This is near the base of the low nose of North Guardian Angel. Make your way east about 400 feet and cross over the head of a drainage running down to the south.
If you are going up to North Guardian Angle, follow up the crest of this ridge to bigin the ascent.
- wSGA-Apr06
Lat/Lon (WGS84): N 37.32015
W -113.05270
Elev: NaN Feet
Head of a drainage running down to the south. Contour around the head of the drainage to travel south and follow the slick rock up the left (east) side of the drainage. As you make your way up the slickrock slope you will have a beehive like rock above you on your left and the drainage you went around on your right.
- wSGA-Apr07
Lat/Lon (WGS84): N 37.31910
W -113.05214
Elev: 6,600 Feet
Top out of the slickrock slope after contouring around a drainage. From this top out begin traveling down the slope to the south. As you descend to the south veer left (southeast) and route find your way over to the crest of the major ridge running down south. You will cross over a minor drainage as you get over to the crest of the ridge.
Great view of South Guardian Angel about 1.7 miles away to the southwest and SGA Canyon dropping down right from the middle of South Guardian Angel.
- wSGA-Apr08
Lat/Lon (WGS84): N 37.31687
W -113.05051
Elev: NaN Feet
Passing between two sandstone hills along the crest of the ridge. Continue south down the ridge toward an area with some hoodoo like features with black conglomerate tops.
- wSGA-Apr9
Lat/Lon (WGS84): N 37.31607
W -113.05033
Elev: 6,280 Feet
This is about 130 feet before you get to a steep drop off along the ridge preventing further travel down the ridge.
To follow the easier route, follow a cairned route leaving the crest of the ridge and travel right (east) down slopes into a drainage about 275 feet to the right (east). The route is sometimes well cairned and is relatively easy to follow. If you do not find the cairns and continue down the ridge another 130 feet you will get to a point along the ridge with a steep drop off preventing travel down the ridge.
- wSGA-Apr10
Lat/Lon (WGS84): N 37.31630
W -113.04948
Elev: NaN Feet
Cairned route drops into then follows south down a drainage.
- wSGA-Apr11
Lat/Lon (WGS84): N 37.31577
W -113.04919
Elev: NaN Feet
Cairned route contours to the left (east) out of the drainage. Route find along the cairned route southeast about 200 feet to the next ridge over.
- wSGA-Apr12
Lat/Lon (WGS84): N 37.31540
W -113.04869
Elev: NaN Feet
Cairned route gets to the next ride. Route find your way south down the ridge. A little over 400 feet south the ridge slowly becomes a wide drainage.
- wSGA-Apr13
Lat/Lon (WGS84): N 37.31404
W -113.04806
Elev: 5,880 Feet
Cairned route follows down a wide drainage to the south. Follow the cairns south down the drainage.
If you travel east from here you will get to the top of a huge cliff looking down into a massive draiange.
- wSGA-Apr14
Lat/Lon (WGS84): N 37.31366
W -113.04815
Elev: NaN Feet
Head of a steep ravine / drainage running south down toward the Subway. Travel south down the ravine toward the Subway. This ravine is very steep and has a few spots to bushwhack and downclimb over some minor drops.
- wSGA-Apr15
Lat/Lon (WGS84): N 37.31302
W -113.04774
Elev: NaN Feet
Ravine drops down into wide open spaces where there are some use trails continuing south over toward the Subway and will lead to a cliff band where you cannot climb down into the Subway. Instead of following the use trails south, turn left and go east about 100 feet over to the top of another ravine / drainage.
- wSGA-Apr16
Lat/Lon (WGS84): N 37.31305
W -113.04751
Elev: NaN Feet
Top of a ravine / drainage, scramble your way down for about 100 feet to a large flat landing. From that flat landing drop down to the right into more ravine and scramble your way down into the Subway.
Note: As you travel down the ravine from the large flat landing the rock wall on the right will open up a short distance down where you can turn hard right and scramble down a steep dirt path into the bottom of the ravine. As soon as the rock wall subsides make your way down into the bottom of the ravine! If you dont turn right and instead follow well worn social trails on a more gentle slope, you will find a cliff out and be forced to backtrack.
- jSubway-SGA
Lat/Lon (WGS84): N 37.31245
W -113.04730
Elev: 5,510 Feet
SGA route crosses The Subway here. Walk across to the ravine on the opposite side and travel south up the ravine to get up and out of The Subway.
As you start south up the ravine out of the Subway do not stay in the middle of the ravine which will lead up to huge boulders you can not climb up over. Instead stay on the far right side of the ravine to an upclimb about 100 feet up out of The Subway just after passing an arch feature.
The upclimb is in two stages of about 10 feet then 8 feet with the second part being a bit sketchy. After getting up the upclimb, work your way back into the middle of the ravine above the large boulders.
A little farther up the ravine is a fork where you will want to continue up the left fork and scramble your way up to where you can get out of the ravine on the LUC (east) side out onto dirt slopes with some use trails forming.
- wSGA-Apr17
Lat/Lon (WGS84): N 37.31230
W -113.04694
Elev: NaN Feet
Just above a fork in the ravine. As you travel up the ravine scramble up the left fork then shortly up the left fork scramble your way out onto the LUC (east) side onto steep dirt slopes with use trailsleading up the bank. Follow the use trails south up the steep slopes about 200 feet to a saddle on the canyon rim above.
- wSGA-Apr18
Lat/Lon (WGS84): N 37.31177
W -113.04678
Elev: 5,740 Feet
Saddle on the canyon rim. Drop down the slopes to the south into a drainage about 350 feet away.
- jSGA-N.Pole
Lat/Lon (WGS84): N 37.31096
W -113.04632
Elev: 5,710 Feet
In the drainage down from the saddle. To continue to South Guardian Angel turn left to walk northeast up the drainage in wide open sandy wash with some low water flow and grasses.
Turn right and go southwest down the drainage if you plan to go down into North Polel Canyon.
- wSGA-Apr19
Lat/Lon (WGS84): N 37.31117
W -113.04519
Elev: NaN Feet
Fork in the wash. To continue to SGA travel south up the right fork. Some sections of the wash have use trails on the RUC side that may make travel a little easier?
- wSGA-Apr20
Lat/Lon (WGS84): N 37.30883
W -113.04553
Elev: NaN Feet
A pool in the wash that you will need to bypass with a little bushwhacking. Continue up the wash or the occasional use trail for about 0.6 miles to where the sandy wash gets to the bottom of a large sandstone dryfall.
- wSGA-Apr21
Lat/Lon (WGS84): N 37.30166
W -113.04974
Elev: NaN Feet
Sand wash gets up to the bottom of a 30 or 40 foot sandstone dryfall. Scramble your way up the dryfall or take the easier route and bypass on the slopes on the left (south).
From the top of the dryfall, route find your way southwest up the very wide slickrock drainage for about 600 feet to where it gets steeper as you approach a big vertical wall. Note that the drainage is very wide and does not feel like a distinct drainage.
- wSGA-Apr22
Lat/Lon (WGS84): N 37.30049
W -113.05114
Elev: NaN Feet
The slickrock drainage begins to get steep. From here veer left (south) and route find your way up the steep slickrock about 200 feet to a scramble / upclimb of about 15 feet near a small peak.
- wSGA-Apr23
Lat/Lon (WGS84): N 37.30005
W -113.05124
Elev: 6,210 Feet
Upclimb of about 15 feet near a small peak which may be awkward with a heavy pack on. From the top of the upclimb contour around the small peak to continue west about 150 feet to a small saddle like area where you can start to see the peak of South Guardian Angel.
- wSGA-Apr24
Lat/Lon (WGS84): N 37.29997
W -113.05168
Elev: NaN Feet
Small saddle like area where you can start to see the peak of South Guardian Angel. From here route find your way west toward South Guardian Angel contouring around ridges and bowls where needed. About 0.25 miles farther you will be at a shallow saddle where you can see the slickrock ridge leading up South Guardian Angel.
- jSGA-Canyon
Lat/Lon (WGS84): N 37.29936
W -113.05521
Elev: 6,485 Feet
Shallow saddle where you can see the slickrock ridge leading up to South Guardian Angel Peak to the south and you can see South Guardian Angel Canyon down to the right (west).
To continue up to SGA peak scramble about 0.4 miles southwest up to the peak. To drop down into SGA Canyon, leave the slickrock ridge here and route find your way about 1200 feet southwest to where you can walk down into the canyon about 200 feet below the headwall. You will need to route find your way around a couple drops on the way there.
- ySGATp
Lat/Lon (WGS84): N 37.29787
W -113.05901
Elev: 6,470 Feet
Top of South Gaurdian Angel Canyon where you walk into the side of the water course about 200 feet from the head wall.
You can scramble up to the head wall if desired.
|
| SGA 3 - Side trip to South Guardian Angel Peak |
- jSGA-Canyon
Lat/Lon (WGS84): N 37.29936
W -113.05521
Elev: 6,485 Feet
Shallow saddle where you can see the slickrock ridge leading up to South Guardian Angel Peak to the south and you can see South Guardian Angel Canyon down to the right (west).
To continue up to SGA peak scramble about 0.4 miles southwest up to the peak. To drop down into SGA Canyon, leave the slickrock ridge here and route find your way about 1200 feet southwest to where you can walk down into the canyon about 200 feet below the headwall. You will need to route find your way around a couple drops on the way there.
- wSGA-Apr25
Lat/Lon (WGS84): N 37.29790
W -113.05576
Elev: NaN Feet
Sandstone on the ridge up to SGA peak goes from red to white color.
- wSGA-Apr26
Lat/Lon (WGS84): N 37.29635
W -113.05771
Elev: NaN Feet
Top of the steep portion of the ridge.
- wSGA-Apr27
Lat/Lon (WGS84): N 37.29560
W -113.05935
Elev: NaN Feet
Top of what may be the true top of SGA canyon. It is a crack about 1 foot wide that drops down through SGA for what looks like all the way down to the base of the major peak. It looks and feels like the mountain is literally split in half with this tiny crak you can step over. Do not fall in.
- pSGA
Lat/Lon (WGS84): N 37.29554
W -113.05992
Elev: 7,138 Feet
Top of SGA
|
| SGA 4 - Exit |
- ySGA-Bt
Lat/Lon (WGS84): N 37.30559
W -113.05895
Elev: 5,160 Feet
Bottom of SGA Canyon where it dumps into the Subway.
- sDinosaurTrks
Lat/Lon (WGS84): N 37.29957
W -113.06992
Elev: NaN Feet
Dinosaur Tracks in a large rock RDC. Pretty deep ones with good clarity.
- jFootTrlSgn01
Lat/Lon (WGS84): N 37.28924
W -113.08490
Elev: NaN Feet
Foot trail sign by the creek showing the way to the junction for the Left Fork North Creek trailhead.
- jLftFrkNrthCk
Lat/Lon (WGS84): N 37.28891
W -113.08558
Elev: 4,670 Feet
Junction where Left Fork North Creek trail drops into the wash.
- tLftFrkNrthCk
Lat/Lon (WGS84): N 37.28480
W -113.09576
Elev: 5,070 Feet
Trailhead for the Left Fork of North Creek trail.
|
| SGA 4 - The Canyon |
- ySGATp
Lat/Lon (WGS84): N 37.29787
W -113.05901
Elev: 6,470 Feet
Top of South Gaurdian Angel Canyon where you walk into the side of the water course about 200 feet from the head wall.
You can scramble up to the head wall if desired.
- dSGA-R01
Lat/Lon (WGS84): N 37.29816
W -113.05889
Elev: NaN Feet
Raps 1 - South Guardian Angel Canyon. Anchored from a stout bush on the LDC rim about 40 feet down canyon of the top of the drop and drops about 80 feet down a narrow crack. Rap 1 may possibly be downclimbed but it would be a bad idea due to an awkward start to get under a false floor and the lower portion being very slick with moss.
Note - Rap 1 alternate anchor options:
There is a large pine tree near the head of the drop that could be used but would place the rope over a VERY sharp edge. There are also choke stones at the top of the drop but these will force the rope into v-slots creating rope pull issues and create a very awkward start.
Right after rap 1 is another drop of about 35 feet that is bypassed by climbing down along the crack and ledge system on the RDC side. There are a lot of little huecos in the rock here that are interesting to look at and play in. Part way down the ledge system on the RDC side is a drop of about 6 feet that is pretty awkward. providing a handline to everyone and a partner assist here for the last person makes this pretty simple. Although this drop is a downclimb it looks like a bad idea when just looking from the top. After getting someone down on rope they can easily assist others.
About 50 feet after the downclimb is rap2.
- dSGA-R02
Lat/Lon (WGS84): N 37.29840
W -113.05880
Elev: NaN Feet
Rap 2 - South Guardian Angel Canyon. Anchored from a large rock in the wash about 10 feet back from the drop and drops about 12 feet with a very awkward start.
From the bottom of rap 2 contniue down a narrow slot with level floor for about 100 feet to rap 3 where the floor drops out suddenly.
- dSGA-R03
Lat/Lon (WGS84): N 37.29876
W -113.05859
Elev: NaN Feet
Rap 3 - South Guardian Angel Canyon where the floor of the narrow slot just drops out from under you. Anchored from choke stone and drops about 140 feet with a ledge about 25 feet from the bottom into a huge deep feeling chamber.
The anchor is down on the floor of the skinny crack where it is difficult to get to. Starting rap 3 is awkward as you need to stem out past the false floor and past more skinny crack where you will not fit down through then rap down under the false floor where you need to pendulum under a little ways. This start is made more awkward since it is skinny making it difficult to get you and your pack to squeeze through. Facing RDC allows better features for the stem out and pendulum under the top of rap 3. With a lot of effort and attention, the pendulum action can be slow and controlled.
If this place were to be bolted one day this rappel would be a good candidate for a solid set of hangers to allow a rap straight down and no pendulum action.
Exiting the down canyon end of the chamber below rap 3 is done by laying down on your side and worming through a narrow opening at the canyon floor and pushing your pack along the canyon floor for about 6 feet to get where you can stand up and walk. There is one other possible exit about 8 feet up where the crack widens but it would be very difficult to get up to. The rest of the crack is not large enough to allow exit.
Rap 4 is almost 500 feet down canyon after the chamber and is easy wash walking with one downclimb of about 6 feet.
- dSGA-R04
Lat/Lon (WGS84): N 37.29995
W -113.05803
Elev: NaN Feet
Rap 4 - South Guardian Angel Canyon. Anchored from logs wedged about 50 feet back from the drop and drops about 25 feet down a trickling water fall. Since there are not good anchors at the top of rap 4 and you will anchor about 50 feet back. A retrievable anchor like a Smooth Operator can make the pull easier and help reduce rope grooves. After rap 4 is about 250 feet of easy wash walking over to the start of another deep, dark, intimidating crack and rap 5.
- dSGA-R05
Lat/Lon (WGS84): N 37.30066
W -113.05773
Elev: 6,100 Feet
Rap 5 - South Guardian Angel Canyon where the second deep, dark, intimidating crack starts. Anchored from a large pine tree about 65 feet back from the drop then drops down sloped slick rock another 75 feet down to a small ledge down in the slot on the LDC side large enough for 2 to 3 people. The small ledge is right where the crack goes vertical, deep and dark.
From the small ledge scramble up a sloped slickrock ramp to a large vegetated ledge. The scramble up is moderately easy but the consequences of a fall will be fatal as you will fall into the very deep vertical crack. BE SURE to belay the first person up who can then set a rope on a nearby tree to assist everyone else. The belay for the first person up can be done with the rappel rope from rap 5 but a fall would result in a pendulum like fall / tumble. WARNING: This is a tricky spot and care must be taken. This spot is dangerous and careful thought of how to proceeded is needed.
Note: To belay the first person up the slickrock ramp a 190 foot rope is recommended for rap 5. About 150 feet own to the small ledge and another 40 feet up the ramp to the wide vegetated ledge / shelf.
Once up the slickrock ramp and onto the large vegetated ledge, walk down canyon about 180 feet down canyon to a downclimb of about 6 feet where at the bottom you can anchor from a large pine tree for rap 6 down into the slot.
Note: Another option would be to rig from a large tree near the top of the ramp and drop down into the slot from there. Where a 300 foot rope will likely be more than long enough for the rappel but this has not been confirmed. Also of note if you drop down the head of the crack by rappelling here you will be on the up canyon side of a pool to swim at the floor of the crack. To avoid this pool use the rappel station down canyon as described here.
- dSGA-R06
Lat/Lon (WGS84): N 37.30161
W -113.05755
Elev: NaN Feet
Rap 6 - South Gaurdian Angel Canyon. Anchored from a large pine and drops about 240 feet down into the deep dark crack with a few ledges along the way. A partner assistable downclimb of about 6 feet is just before getting to the anchor. Be very careful not to knock rocks off this sloped dirt and rock filled ledge. When pulling your ropes be sure to walk a little up canyon to keep your ropes from pulling down onto logs jammed overhead.
At the bottom of rap 6 is a flat level sandy floor in the bottom of the deep dark crack where you can walk up canyon about 160 feet to the lower part of the vertical head wall of the crack and walk about 300 feet down canyon to where the crack starts to open up and you get to the next rap. Take time to enjoy the belly of this crack as it is a very unique place since it is a combination of water course and deep fault.
- dSGA-R07
Lat/Lon (WGS84): N 37.30235
W -113.05704
Elev: NaN Feet
Rap 7 - South Gaurdian Angel Canyon. Anchored LDC from an arch up on a ledge and drops about 30 feet down the LDC wall to avoid a pool below that would be a swimmer. Optionally you can build a deadman anchor in the sand and rappel about 16 feet down the water course to the pool.
Easy wash walking for about 500 feet to the next rap.
- dSGA-R08
Lat/Lon (WGS84): N 37.30360
W -113.05691
Elev: NaN Feet
Rap 08 - South Gaurdian Angel Canyon. Anchored from a large pine tree about 30 feet back and drops about 70 feet over some ledges near the top then goes free hanging over an alcove. About 9 feet after the rap is a 20 foot drop to bypass.
- SGA-Cyn02
Lat/Lon (WGS84): N 37.30380
W -113.05672
Elev: 5,760 Feet
Drop of about 20 feet to bypass on the LDC side by traversing along a sloped dirt bank over and down to the top of the next rap.
- dSGA-R09
Lat/Lon (WGS84): N 37.30405
W -113.05669
Elev: 5,720 Feet
Rap 9 - South Gaurdian Angel Canyon. Anchored LDC from a pine tree about 20 feet back up out of the wash and drops about 70 feet. The start to this rap can be a little awkward as it starts down a dihedral and keeping your rope in the corner as you head over can be tricky.
Easy walking in sand down to the next rap.
- dSGA-R10
Lat/Lon (WGS84): N 37.30455
W -113.05673
Elev: NaN Feet
Rap 10 - South Gaurdian Angel Canyon. Anchored LDC from a small pine and drops about 30 feet down to a huge ledge in the water course where the final rap is.
- dSGA-R11
Lat/Lon (WGS84): N 37.30471
W -113.05675
Elev: NaN Feet
Rap 11 - South Gaurdian Angel Canyon. Anchored from a pine tree on the RDC side of the large ledge about 20 feet back and drops about 305 feet from the lip. The first 25 feet is down a wall then the rap goes free hanging the rest of the way down in a huge very scenic alcove. This is an amazing view so take time to enjoy it!
Warning: Be sure to extend the the webbing for the anchor all the way and slightly over the lip to ensure an easier pull and make the drop only 305 feet. The rappel starts down a crack which you can easily downclimb into while on rope allowing a safe way to get down the start of the rappel with the anchor webbing extended slightly over the lip.
There are big flat ledges on both sides of this rappel. The RDC ledge allows you to laydown and look over to see the entire drop and see if your rope bag is on the ground.
From the bottom of the final rap walk down canyon around a huge rock and dirt island with a couple scramble spots down to the Subway about 750 feet west.
- ySGA-Bt
Lat/Lon (WGS84): N 37.30559
W -113.05895
Elev: 5,160 Feet
Bottom of SGA Canyon where it dumps into the Subway.
|