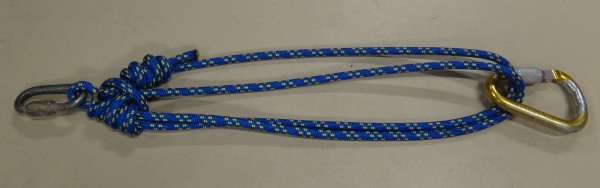
Purcell Prusik for a Safety Tether
What is a Purcell Prusik?
A purcell prusik is a loop of cord tied into an
adjustable loop using a prusik on itself. This creates an
adjustable tether to be used as a safety tether or anything else you
want to use it for. If you would like to know more about it keep
reading. If you want to learn to tie one keep reading more.
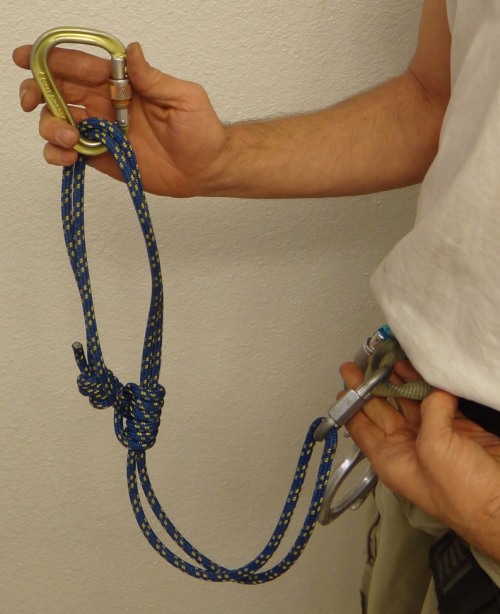
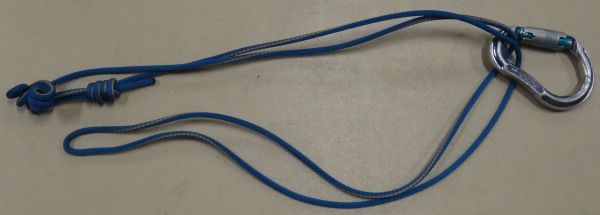
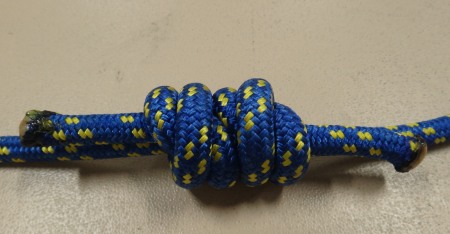
Purcell Prusik in use.
Why use Purcell Prusik?
An adjustable tether makes things a lot safer when used
properly!
Very short falls can produce enough force to shock gear
to its breaking point. Falls of only 1 or 2 feet can potentially cause
some gear to fail. For a little more detail on this take a look at
some of the info on the Safety Tether
page.
Purcell Prusiks are cheap (make your own from cord),
very adjustable, can be lengthened under load, can be used as an
ascender in a pinch, can be useful in passing knots or other situations
where adjustability is helpful.
One of the major advantages of the purcell tether is
its ability to reduce the forces under a shock load. When a shock load
is experienced the prusik knot will initially slip a little then lock
up. The initial slip of the prusik absorbs some of the energy and
reduces the stress on the system and the canyoneer attached to the
tether.
A test posted on
www.caves.org indicated that falls of
between 31 and 51 inches on purcell prusiks subjected a test dummy (181
pounds) to forces of about 5kN (1117 lbs). When 183 pound steel
plates were used in place of the test dummy the forces were about 6.6kn
(1489 lbs) with the same fall. This information can be found in
the pdf file titled
Nylon Highway Issue 54.
Tests with similar fall lengths and weights on slings
have been done by DMM climbing (How
to Break Nylon and Dymeema Slings). Their tests show
significantly higher forces generated (well over 10kN) since the slings
do not absorb shock in the same way the purcell tether does.
Considerations for Purcell Prusik
Decide on what cord to use:
Purcell Prusiks are generally tied using 5mm to 8mm
cord. Purcell prusiks tied with small cord are less bulky and easier
to manage but have lower breaking strengths. As noted above testing
with purcell prusiks shows shock loads created from falls up to 51 inches
with test dummies and steel plates can generate forces of 5kN to 6kN.
In general it is best to keep the breaking strength of what cord you use
higher than 6kN.
No matter what cord you choose there is one very
effective way to significantly reduce the forces on your purcell prusik
safety tether....... Use it properly! One of the virtues of the
purcell prusik is its adjustability. When using the purcell prusik as
a tether ALWAYS shorten the safety tether when you are clipped in to
something. Remember the large forces in all those tests were generated
with shock loads from falls of 31 to 51 inches. If you clip in then
shorten the safety tether until there is little to no slack left in the
system, you will only be able to fall a few inches.
Some cords offer breaking strengths of up to 13kN.
Keep in mind high strength is not the only consideration for a purcell
prusik cord. Cords that are more stiff will require prusik knots with
more wraps to in order to prevent accidental slipping making a larger,
bulkier less manageable tether.
Cord Comparison:
Mummut 7mm Pro Cord ----- -------------
Breaking Strength 13kN (2922 lbs)
The Mammut Pro Cord
is stronger and is thinner than the BlueWater cord so it seemed to be the better choice
between the two. In practice this is not the case. Unfortunately
the Mammut Pro Cord is more stiff. The stiffer
cord made tying the prusik much more difficult. I also found the
that the Mummut Pro Cord locked up after fully loading with both a 2 wrap and
a 3 wrap prusik making it difficult to release and slide again.
BlueWater 8mm Dynamic Prusik Cord -----
Breaking Strength 11.1kN (2495 lbs)
The BlueWater Dynamic Prusik Cord was easier to tie, held well with both the
2 or 3 wrap prusik knots and did not lock up after loading. I used
this cord for my purcell prusik safety tether for a few years before using
the CMC Rescue Cord
CMC Rescue 6mm Prusik Cord -----------
Breaking Strength 7kN (1574 lbs)
The CMC Rescue 6mm Prusik Cord is thinner which creates a smaller more
manageable tether. The lower strength as compared to the above two
cords is still above the forces generated in shock load falls with test
dummies and plates on purcell prusik cords. I have found that in
general a 3 wrap purcell prusik works well for my tether so I did not test
this cord with a 2 wrap purcell and just used the 3 wrap. The CMC cord
works well with the 3 wrap purcell prusik and doesnt lock up after loading.
So far I think I like this cord best.
Using a more flexible cord will yield a tether that is
easier to make and works over all smoother. Consider this when
choosing what cord to use when making your Purcell Prusik Tether.
Determine Tether Length:
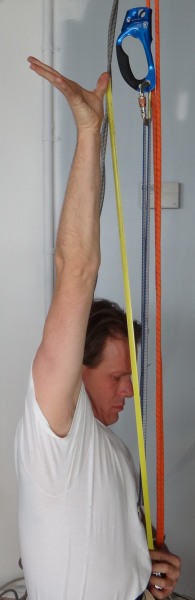
A friend can be helpful when measuring for tether length.
The tether should be sized and made so at full extension, you
can still reach the end of the tether when hanging from it attached to
your harness and fully extended. Doing this ensures you can
always reach the end of the tether.
Just putting some cord on your harness and pulling it
up is not a good indicator of the proper length. The harness can
stretch when weighted and how it is attached to your harness will effect
total length. The tether can be
girthed hitched to the harness, attached with a carabiner or attached with a
rapid.
I prefer mine attached with a rapid to keep bulk
down. This also gives an extra rapid and a length of accessory
cord for an emergency anchor solution by dismantling your tether.
I prefer the length of my tether to be 33 inches when
fully extended. Hooking one end to the harness with a rapid gives the
right length for me and my particular harness. Everyone and their gear
will be slightly different, so take a minute to measure yours.
To gauge the length you need for your tether, attach a
sling your harness in the same way you plan to attach the tether (girth, carabiner, rapid etc.) In my case I will be using a rapid.
Attach the other end of the sling to an ascender of any sort and attach
it to a hanging rope. Slide the ascender up so you are able to sit
in your harness and hang from the ascender. Stretch and reach
about as
high as you can with one arm. Make it a comfortable fully extended
stretch not an all out give it all you got stretch. Measure from the lower end of the sling up to the
tip of your thumb.
A friend is a great tool to help out with this. You
will be measuring from the lower end of the sling not all the way down
to the harness or the rapid. This is the length you will need for your
tether when it is fully extended. If the tether gets fully extended
while in use, you will still be able to reach the end when needed.
Note the length you need and write it down for use
later.
Determine Tether Configuration
Joining Knot near the End of the Tether
The Purcell Prusik needs to have the ends of the cord joined to make a
continuous loop before the Prusik is tied (using a Figure 8 Knot or a
Double Fisherman's Knot).
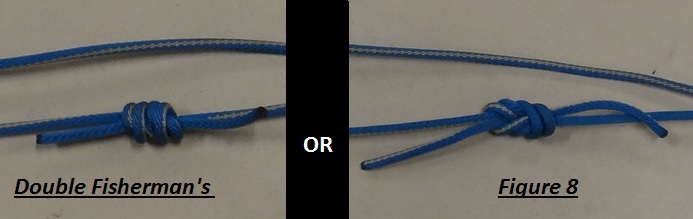
A joining knot can be either a Figure 8 Knot or a Double
Fisherman's Knot.
After creating a complete loop from your cord you will tie the prucell
prusik and need to decide where the joining knot is placed in your
completed Purcell Prusik Tether.
Some sources instruct
to place the the joining knot somewhere near the end of the tether away
from the prusik knot. However, doing this can reduce the
versatility of your tether.
Placing the knot near the very end
will allow for a greater range of adjustability but will prevent the
tether from being used as an emergency ascender.

Placing the knot close to the end allows maximum adjustment
range.
But does not allow the tether to be used as an emergency ascender.
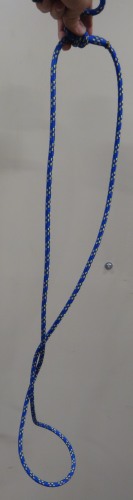
Shown here at
Full Extension - Tether about 38 inches.

Placing the knot close to the end allows maximum adjustment
range.
But does not allow the tether to be used as an emergency ascender.
Shown here
Fully Retracted - Tether about 20 inches.
Placing the knot
away from the end will allow the tether to be used as an emergency
ascender but will greatly reduce the adjustment range. There is a
trade off here so you can not have the best of both.

Placing the knot
away from the end allows the tether to be used as an emergency ascender.
But
greatly reduces the adjustment range.
Shown here at Full Extension - Tether about 38 inches.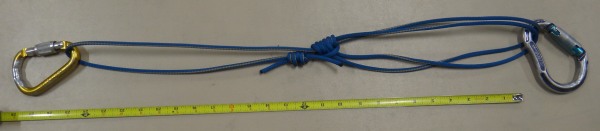
Placing the knot away from the end allows the tether to be used
as an emergency ascender.
But greatly reduces the adjustment range.
Shown here at Fully Retracted - Tether about 26 inches.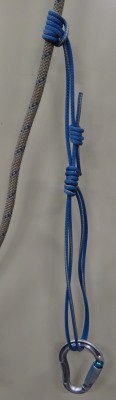 A Purcell Prusik Tether can be used as an emergency ascender set
up like this.
A Purcell Prusik Tether can be used as an emergency ascender set
up like this.
Placing the joining knot at the end or near the end of
the tether has trade offs. I want the best of both worlds so I do
not like this configuration.
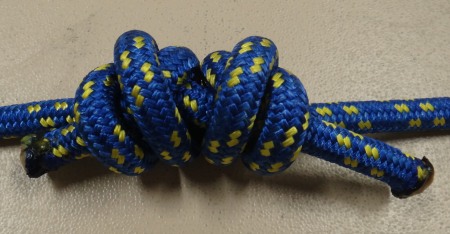
Joining Knot on the Bridge of the Prusik Knot
I tried a different method which is to use a double
fisherman's knot and place it so it is part of the bridge of the prusik
knot. This allows maximum adjustment range and
allows the tether to be used as an emergency ascender. However
when the leash is fully extended and cinched around a carabiner it can
be a little difficult to loosen it up. And while the
prusik performs well, it does deform more easily.
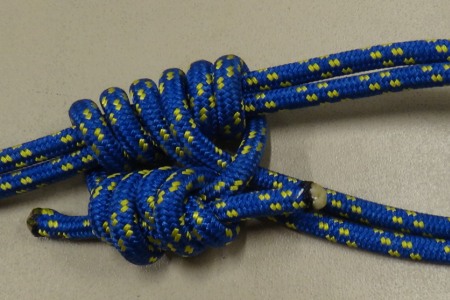
Close up view of the Double Fisherman's Knot positioned on the
bridge of the Prusik Knot.
Since the Prusik knot is the work horse of the tether I
prefer to keep it neat,
so this is not my preferred configuration.
Joining Knot Next To the Prusik Knot
To over come the issue of cinching on the carabiner
and keep the prusik clean I decided to move the double fisherman knot so
that it is outside of
the prusik but butted up right next to it.
This still allows maximum adjustment range and for the tether to be used
as an emergency ascender.
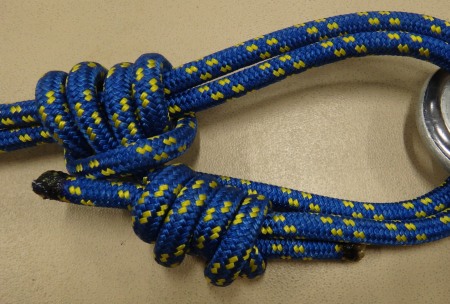
Close up view of the Double Fisherman's Knot
next to the Prusik Knot.
With the Double Fisherman's Knot next to the Prusik the tether
can be used as an emergency ascender and has maximum adjustment range.
This configuration offers the best of all worlds and is my preferred configuration. But a word of caution; Since
there is no knot at one end, it is possible to pull the loop back out of
the prusik and accidentally untie the prusik. As long as you keep a carabiner on your tether this will not be an issue. This is just
something to keep in mind in the event it becomes a possibility.
The end to worry about is the end you should have attached to your
harness and should not be a concern unless you remove the tether from
your harness to use as an emergency ascender.

If the end loop does not have a carabiner or rapid in it, the
loop can be pulled through the prusik knot.
If the loop pulls through, the prusik will fall apart and your
tether will fall apart as well.
2 wrap or 3 wrap Prusik?
Most tests on the purcell prusik are done with either a
2/3 wrap prusik or a 3 wrap prusik. I like how easy the 2
wrap prusik slides but it slips at lower forces. A 3 wrap prusik seems
to be the
way to go.
Finally Tie the Tether
Measure Needed Cord Length
Tying the purcell prusik with my preferred
configuration
makes it difficult to adjust the length of the tether while it is being
made. So having the exact cord length before you start is helpful.

Cut the right length of cord first.
To determine the length of cord you need....
First - ----- consider your personal
measurement
Multiply the measurement you
came up with when measuring for tether length by 2.
My personal measurement was 33
inches so that is 66 inches.
Second - -- allow extra cord for what is used
to tie the knots
We need to allow for the amount of cord used up to tie the knots.
For this example I will be using the 6mm CMC Rescue Prusik Cord.
A double fisherman knot for joining the loop will use 18 inches of cord
(including 1.5 inch tails left on the knot).
The 3 wrap Prusik Knot will use 15.75 inches of cord.
Third - ---- allow for the Reality Factor
As with a lot of things in life
theory doesn't always line up with reality.
Add about
3 more inches to account for the "Reality Factor".
Fourth - --- add it all up
66 inches + 18 inches + 15.75 inches + 3 inches
for a total cord length of 102.75 inches (8 feet 6.75 inches).
The amount of cord you need may be different if you
use different cord. Both diameter and pliability will effect this.
If you use a different cord you will need to experiment a little to get
it right. Below are the lengths needed for the cords I have played
with.
Note:
6mm CMC Rescue Prusik Cord:
This cord works well and is what is used in this example.
18 nches of cord are used to tie a double fisherman's knot including
1.5 inch tails.
15 inches
are used with no tail length left.
11.25 inches of cord is used to tie a 2 wrap prusik on itself.
15.75 inches of cord is used to tie a 3 wrap prusik on itself.
8mm Bluewater Dynamic Prusik Cord:
This cord works well but is larger and more bulky than what I prefer.
22 inches of cord are used to tie a double fisherman's knot including
1.5 inch tails.
18.75 inches
are used with no tail length left.
15 inches of cord is used to tie a 2 wrap prusik on itself.
22.5 inches of cord is used to tie a 3 wrap prusik on itself.
7mm Mammut Procord: -
Too stiff so not a good cord for this.
20.5 inches of cord are used to tie a double fisherman's knot including
1.5 inch tails.
17.5 inches
are used with no tail length left.
16.0 inches of cord are used to tie a 2 wrap prusik on itself.
19.5 inches of cord are used to tie a 3 wrap prusik on itself.
Join the ends of the cord using a Double
Fisherman Knot.
Tie the first side of the double fisherman leaving a 1.5 inch tail. 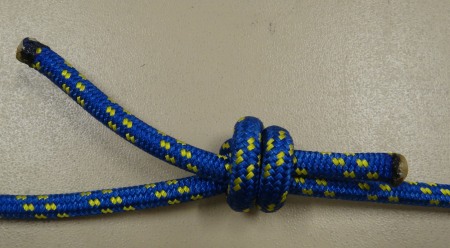
Tie the first half of the Double Fisherman's Knot.
1.5 inch tail on the right.
After tying the first side of the double fisherman's
knot be sure to adjust the rope so the loop created is not twisted.
It should naturally fall into a smooth loop. Before tying the
second half of the fisherman knot, twist the cord that is passing through
the knot until the formed loop is a natural loop. Now is the time
to do this so you do not end up with a leash that likes to tangle up.
 After
tying the first half of the Double Fisherman's, check to see if it is
twisted.
After
tying the first half of the Double Fisherman's, check to see if it is
twisted.
Twist the inner cord until the loop falls naturally so finished
tether is neat.
Next tie the other half of the double fisherman's knot.
Be sure to get the wrap going in the proper direction. The twists
should nestle into each other neatly when slide together. If you
get it wrong just wind the second side of your knot in the opposite
direction.
Check the direction of the second half of the Double
Fisherman's. If it doesn't nestle into the other side neatly it is
wound in the wrong direction. Reverse the direction.
When the second half of the Double Fisherman's is wound in the
proper direction the two sides will pull together and nestle in very
neatly.
Finish up the double fisherman's by cinching it down
tight and get it dressed well. Be sure you have 1.5 inch tails
before you fully load and tighten the knot. Place a foot in the
loop and pull the other side with both hands very hard and get the knot
real tight.
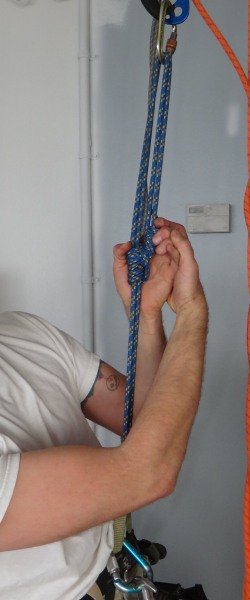
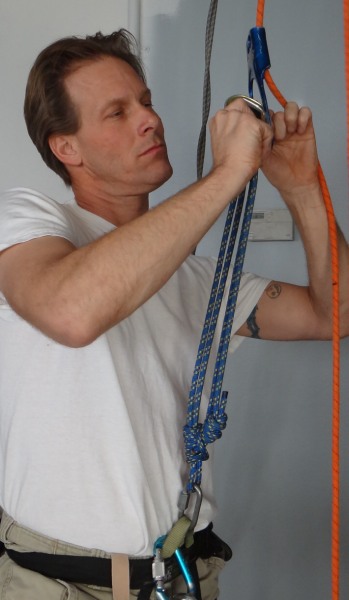
Tie the Prusik on itself
Start by holding the cord in the left hand so the fisherman knot is
behind your hand as shown. Then wrap the top of the cord around
your top two fingers two times and adjust the fisherman knot so it is at
the back of your fingers but adjusted all the way up as shown.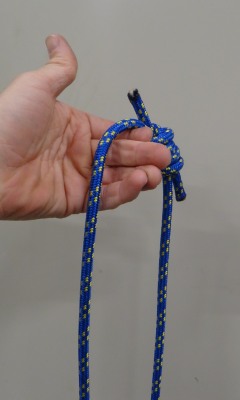
Hold the Cord in your hand near the joining knot.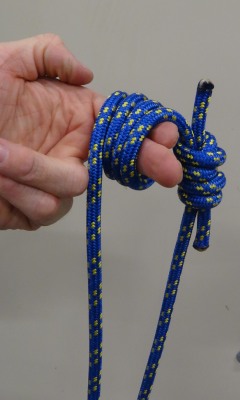
Wrap 3 wraps around your first two fingers in the direction
shown and the joining knot positioned as shown.
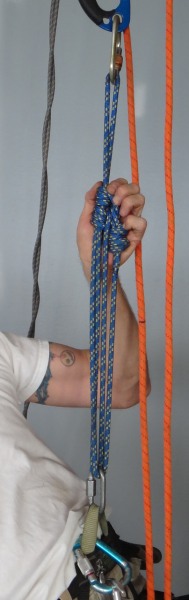
Next wrap the bottom of the cord around your bottom two
fingers two times as shown.
Wrap the other side around the bottom two fingers as shown.
The strand on the far left running from top to bottom will become the
bridge of the Prusik Knot after the next step.
Next move the loops from your bottom two fingers to your
top tow fingers as shown. Be sure to leave your fingers in the loops
to keep the Prusik from falling apart before you run the other end of
the cord through it.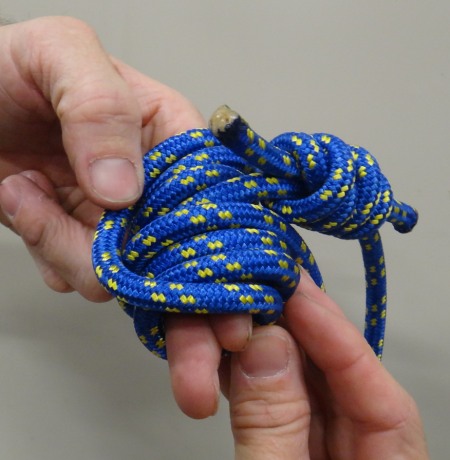
Carefully fold the loops from your bottom two fingers up onto
your top two fingers with the other loops. Note this is now a
Prusik Knot wrapped around your finger. Don't take your fingers
out until you run the end of the cord through the Prusik.
Next take the other end of your loop and pass it
through the inside of the prusik knot where your fingers were.
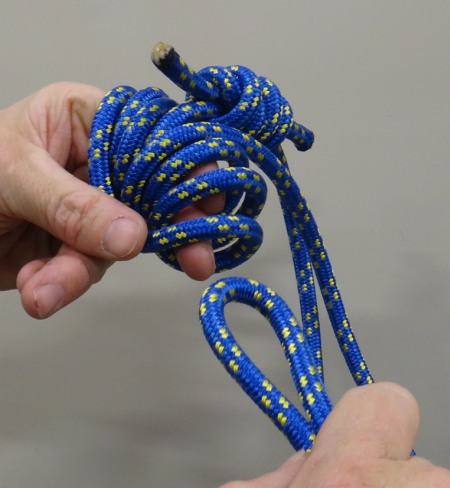
Feed the other end of the tether through the Prusik to replace
your fingers.
After feeding it the loop through the Prusik it should look like
this.
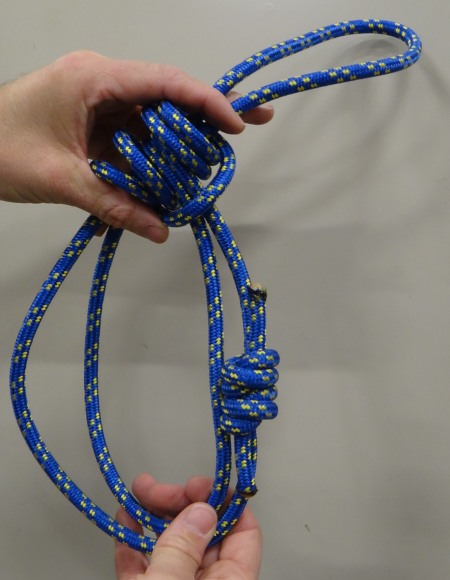
Now dress and tighten the prusik knot. While
tightening the prusik keep the double fisherman knot tight up against
the bridge of the prusik. This will likely be the most tedious
part of the entire process. Take your time doing this and get it
tight. Since the double fisherman knot is to be right next to the
bridge you will need to keep shifting excess cord from the fisherman end
of the prusik and feed it all the way around the knot to the other side in order to
tighten the prusik.
I like to keep one tail of the double fisherman knot
positioned under the bridge of the prusik to help keep things tidy.
After doing the tedious task of tightening the Prusik and
keeping the joining knot (Double Fisherman's) close to the Prusik.
Putting a tail of the Double Fisherman's Knot under the bridge of the
Prusik is optional.
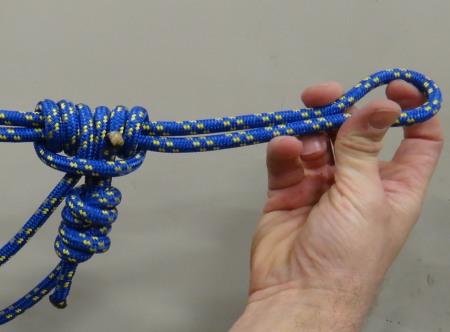
After getting the prusik tight with the double
fisherman knot right next to the bridge of the prusik, clip a carabiner
to the end loop and attach it to an ascender on a hanging rope.
Slide the ascender so that you can stand in the prusik loop. Stand
on the loop and bounce around a little to fully cinch the prusik down.
That's it, you now have a purcell prusik that can be
used as a safety tether. Attach one end to your harness.
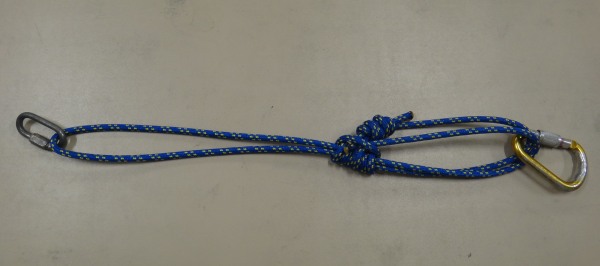
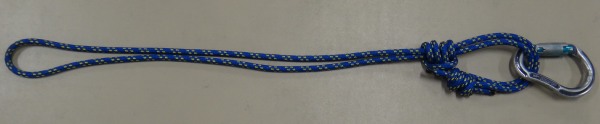
Purcell Prusik Tether completed. Carabiner and rapid
attached and shown Partially Extended.
Purcell Prusik Tether completed. Carabiner and rapid attached
and shown Fully Retracted.
Note / Warning:
To make it safer:
The
end loop should be attached to
the harness when the purcell prusik is used as a personal tether.
The natural reaction when you fall is to reach out and and grab something.
Having the double loop side attached to the harness and grabbing the
knot in a fall would result in the knot sliding and lengthening the
leash. This can't happen if the single loop side is attached to
the harness.
Read the section below for
more on this.
Attach the Purcell Prusik to your Harness
The
end loop of the tether should be attached to
the harness when the purcell prusik is used as a personal tether.
The natural reaction when you fall is to reach out and
and grab something. Having the double loop side attached to the harness
then grabbing the knot during a fall would result in the knot sliding and lengthening the
leash. This can't happen if the single loop side is attached to
the harness.
With the tether attached in the proper direction it will not
accidentally extend if you grab the knot when you fall. If you
panic in a fall you can grab anything you want and the tether will hold
tight.
If you need to extend the tether while under load you can push the
Prusik Knot up and away from you to lengthen the tether even under load
while hanging on it.
The picture above shows the tether hooked to the
harness properly. This is where the single loop end is attached to
the harness and the double loop end has a carabiner on it to use as an
attachment to other things.
The pictures below shows the tether
attached to the harness in the wrong direction. This is where the
double loop end is attached to the harness and the single loop end has a
carabiner on it to use as an attachment to other things. The image
on the left is the tether set up wrong and retracted to keep slack out
of the system. If set up this way you may be in for an unpleasant
surprise one day. If you start to fall you will reach out to grab
something. If that something happens to be the Prusik Knot the
tether will lengthen until fully extended. The image on the right
shows the tether at full extension after grabbing the knot during a fall
with the tether set up wrong.
With the tether attached wrong it can be extended by pulling the
knot toward you. This is exactly what you will do if you fall and
grab the knot. Do not set your tether up this way. 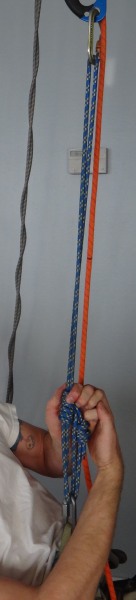
With the tether attached wrong it can be extended by pulling the
knot toward you. The tether will fully extend as shown if you grab the
knot in the event of a fall.
To avoid this attach the single loop end to your
harness and clip a carabiner in the side with two strands forming the
loop.
Adjusting the Purcell Prusik Tether.
The tether can be adjusted from maximum to minimum
length in any increment needed. Just slide the Prusik where you
want it and you're all set.
Purcell Prusik Fully Retracted.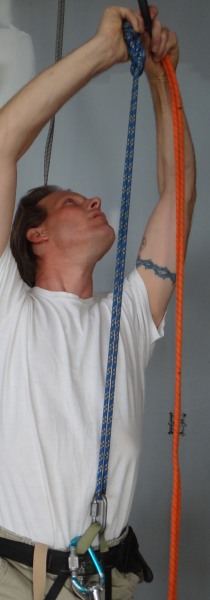
Purcell Prusik
Tether Fully Extended.
To adjust the length of the tether just grab the Prusik Knot and slide it to where you want it.

To adjust the length of the tether, just slide the Prusik Knot
to where you want it.