JellyFish
How to Make one
Here is how I make the JellyFish. If you find an easier or
better way, go for it (and please let me in on your secret method).
FYI I tend to use millimeters as the unit of measure when dealing
with things of this size as I find it easier to think about.
If you prefer inches, feel free to convert. The below shows
how to make the fabric portion of the JellyFish. Be sure to
cut a piece of 3/4 inch schedule 40 PVC pipe about 10 inches long to
use with the JellyFish.
Patterns
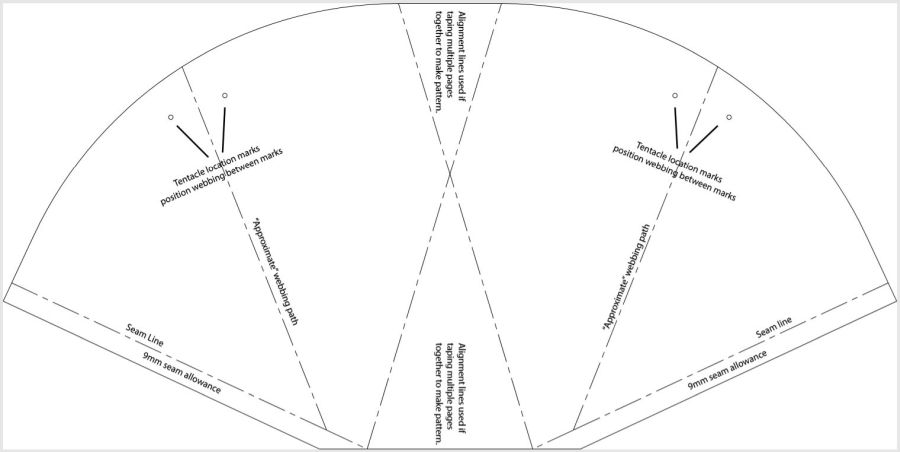 The center
lines in the pattern are only to help align the two halves of the pattern if
printed across 2 pages then taped together.
The center
lines in the pattern are only to help align the two halves of the pattern if
printed across 2 pages then taped together.
I have 3 files to help with the pattern.
1. Drawing with a
few dimensions on it to help those who wish to create their own
pattern or modify mine. Not useful for much else.
2. Printable
PDF single page of the pattern. Works well but is larger than a single
piece of letter sized paper so you will need software to tile
it onto multiple pages. If this is something you are already
familiar and comfortable with, go for it.
3. Printable PDF
tiled two page of the pattern. The tiled two
page file is a printable PDF where the pattern has been split
onto 2 pages with an overlap zone. Print out the 2 pages and
carefully align the pages as needed then use clear tape to join them
as one. The words and the diagonal X
lines in the middle help with getting things aligned well.
Items used
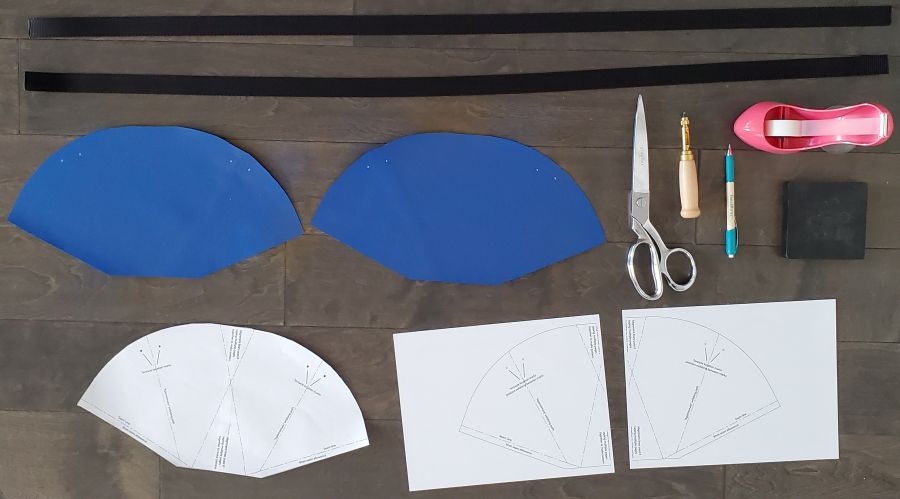 Two webbing
strips cut to length, two fabric pieces cut using pattern, scissors, screw
hole punch, fabric pencil, clear tape, rubber block, pattern and a two page
version of the pattern that can be tapped together.
Two webbing
strips cut to length, two fabric pieces cut using pattern, scissors, screw
hole punch, fabric pencil, clear tape, rubber block, pattern and a two page
version of the pattern that can be tapped together.
Sewing machine. A home sewing machine is not
going to cut it. For this project an industrial
sewing machine is recommended.
Folder attachment. For adding grosgrain tape (that pretty
black edging added to most sewn gear) you can fold and hold it in
place by hand as you sew but that is a HUGE pain. I use what
is called a folding attachment for my sewing machine that folds and
positions the
grosgrain onto the fabric as I sew. This
makes life super nice! I tried a few cheap ones found online that did
the job but were super finicky. Todd recommended Tennessee
Attachment Company set me up with folder for my specific sewing
machine. Expensive but works very well. If you
decide to contact Tennessee Attachment Company be aware, they have
an old
school feel and you will have a few back and forth conversations
with them before figuring out exactly what you need.
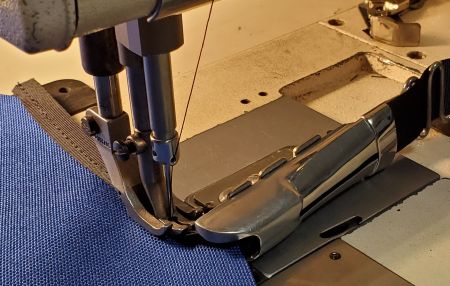 Folder attachment adding grosgrain tape to the JellyFish.
Small items also used. Screw hole punch
(optional but does make hole punching simple). Rubber block as
a backing when using the punch (also optional). Clear tape.
Fabric marking pencil (Fons and Porter pencils work well and can be
scrubbed off later if desired). Scissors.
Thread and stitch count. A very common thread
for sewn gear is #69 (TEX70) multithread bonded nylon thread.
Different manufacturers use different stitches per inch when sewing
gear. There is not set standard making one better than the
other. The general range is 6 to 9 stitches per inch. I
typically use around 7.
Fabric. The JellyFish uses 1000D Cordura
which is a pretty standard fabric for sewn gear that needs to take
abuse.
Grosgrain / binding tape. I get 1
inch grosgrain tape from John Howard Company.
Their
description for it is #30110 1" Nylon Tape #5 Medium Finish Black.
Webbing. I use 1 inch flat nylon webbing from John
Howard Company as it was recommended to me as a good item to use.
Their description for it is #50-0755 1" High Tenacity Nylon Webbing Black
#030. I am not qualified to advise on the best place to get
webbing and will let each person research that. John Howard Company
has a $100 minimum order so you better
need a few things if you use them.
A few notes on webbing.
For sewn goods flat webbing is generally used. One advantage
to using flat webbing for sewn goods is the stitching tends to suck
down into the weave a bit helping protect the threads from abrasion.
It is very difficult to know how strong webbing is by looking at it.
Even if you do know the material used (nylon, polyester, etc.), it is
still extremely difficult to know the quality or breaking strength
of webbing simply by looking at it.
Be careful where you get your webbing for making a JellyFish. You
will be hanging your life on it.
In a
forum post on the Canyon Collective Todd Rentchler of Climb
Sutra / Canyon Werks had this to say... "The multitude of
manufacturers of 'unknown origin' for tubular webbing is scary
enough- but flat-weaves are way worse- there are lots of variations
that yield a wide variety of breaking strengths from quality to junk
that are hard to tell apart." Todd has been in the business for
many years making professional harnesses and various sewn goods for
the movie industry and really knows his stuff. I have been
lucky enough to learn a few tid-bits from him. In that same
forum post he added a picture of 7 pieces of flat webbing, then had this to say about the image: "These are some samples of
webbing we use for manufacturing. The bottom three are easy to
reject as 'not strong enough for a canyon' due to the material being
noticeably thinner. But the top four, ranging in (theoretical)
strength from 6,000 lbs to 3,000 lbs, are VERY difficult to tell
apart."
 The top four
pieces of webbing range in (theoretical) strength from
6,000 lbs to 3,000 lbs, are VERY difficult to tell apart.
The top four
pieces of webbing range in (theoretical) strength from
6,000 lbs to 3,000 lbs, are VERY difficult to tell apart.
That is a 3000
lbs difference in strength in the top 4 items, can you tell which is which?
Know what you have before placing your life on it.
Cut Materials
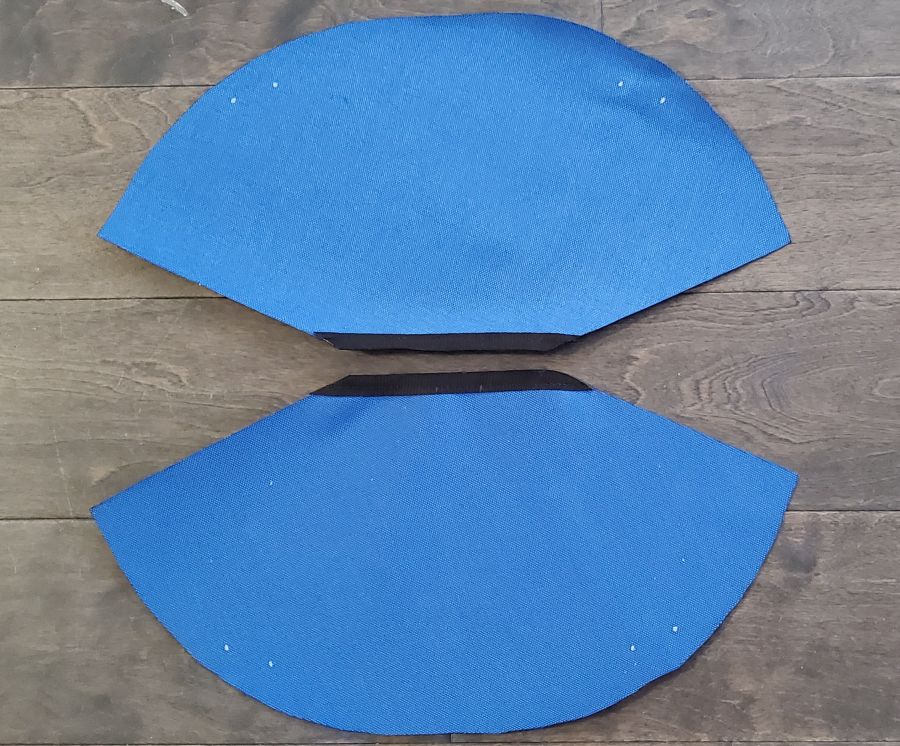
JellyFish Body.
Cut two pieces of 1000D Cordura to make the Body of the
JellyFish. The two pieces are identical so you will need to
use the pattern twice to cut out 2 pieces. Taping the paper
pattern down to the fabric works well to hold it in place while
cutting it out with scissors.
After cutting out the fabric heat seal the edges. I typically
use a lighter and run it along the edge to melt the edges of the
fabric. This is important if you want your sewn good to hold
up over time. If the edges are not heat sealed they can slowly
unravel (getting more and more fuzzy at the edge) until the sewn in
threads simply pull through to the edge. A quick simple
melting of the edge prevents this from happening. Its a small
thing that does matter.
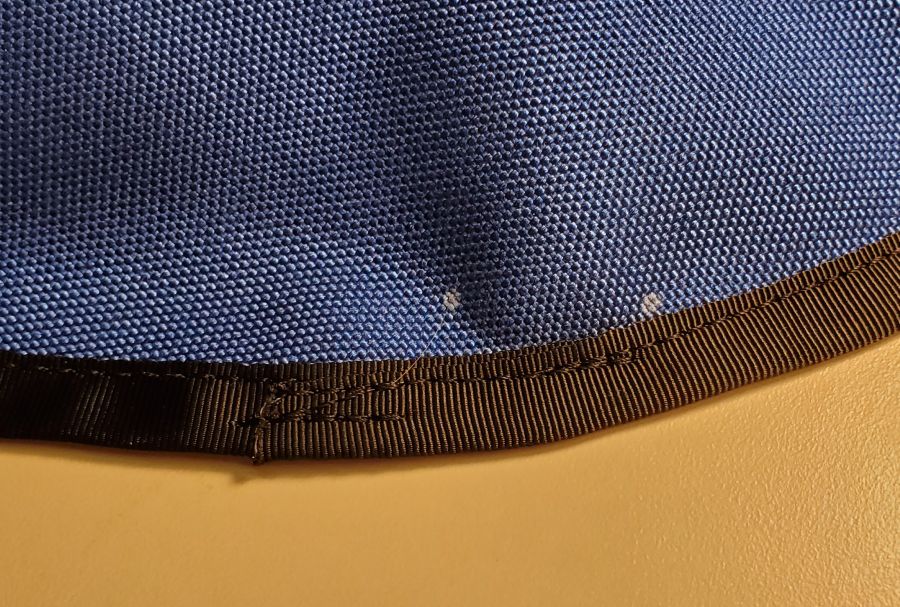
In the pattern are spots to punch holes in the paper pattern
so you can mark the fabric with dots to help align the webbing for
stitching. I use a screw hole punch and a block of rubber to
make it quick and easy to punch out the holes. After cutting
the fabric, keep the paper aligned and use the holes to place marks
on the fabric with fabric pencil. Be sure these marks are made
as they will guide you later.
JellyFish Tentacles. Cut two pieces of 1 inch Nylon
webbing (flat kind not tubular) at 1140mm long. It is not
important for the webbing to be exactly 1140mm long. What is
important is for both pieces of webbing to the same
length.
Heat sealing the ends of the webbing is important just like it is
with the Cordura. If the edged fray and continue to get more
and more fuzzy, the unraveled ends can work their way down to the
stitching and allow the thread to slip out of the end. A
lighter works for this too but more than a quick pass is needed as
the webbing is thicker. I tend to use a propane torch for this
as it makes the job faster.
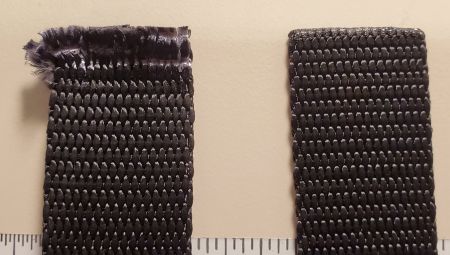 If the edges
of material are not heat sealed, the edge can fray to the point where stitches
pull right out. Webbing on the left is frayed while webbing on the right
has been heat sealed. Which would you trust more there were stitches a
short distance in from the end?
If the edges
of material are not heat sealed, the edge can fray to the point where stitches
pull right out. Webbing on the left is frayed while webbing on the right
has been heat sealed. Which would you trust more there were stitches a
short distance in from the end?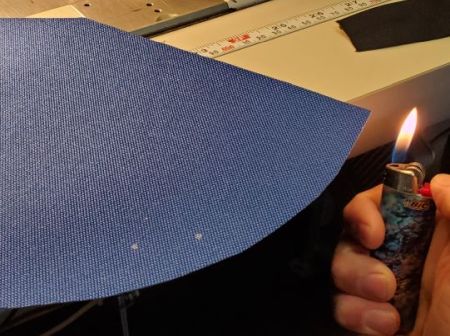 The edges of synthetic fabrics should also be heat sealed. If the edges
fray down to the stitches the seam will fail. Heat seal all edges.
The edges of synthetic fabrics should also be heat sealed. If the edges
fray down to the stitches the seam will fail. Heat seal all edges.
Create JellyFish Body
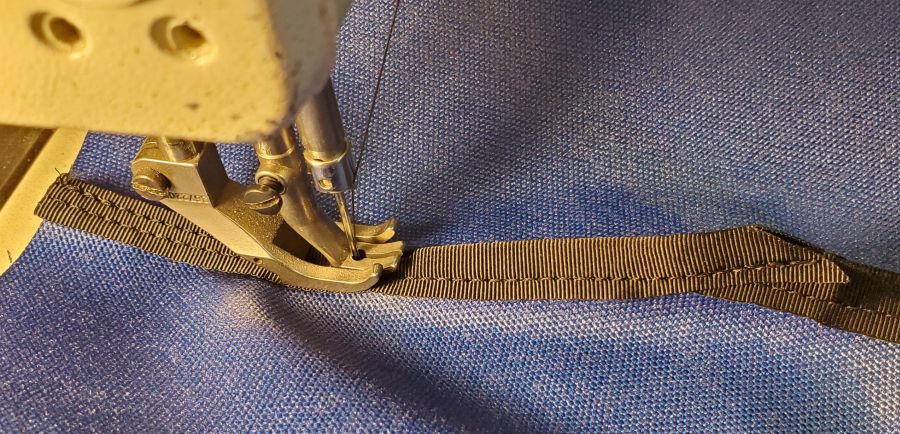
 Add grosgrain tape to the slot edges on both pieces of Cordura.
After trimming the grosgrain tape be sure to heat seal the ends as they can unravel just like the Cordura or webbing.
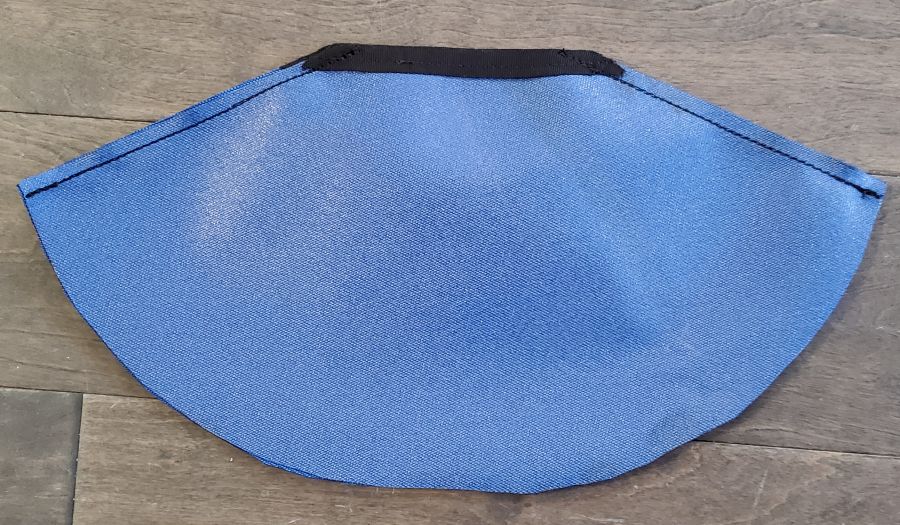 Stitch the
two halves of the Body together with the Right Sides of the fabric together.
Remember to have the right sides (the pretty face of the fabric) of the fabric
facing each other. Place the stitching 9mm (9mm seam allowance) in from the
edge. Stitch down this line two times on each edge. It is good
practice to stitch twice down any seam that needs to be strong. Again its a
little thing that actually makes a difference in the long run. It is difficult
to see in the image since my threads stitched lines are right on top of each
other, but there are actually two stitched lines down each side.
Stitch the
two halves of the Body together with the Right Sides of the fabric together.
Remember to have the right sides (the pretty face of the fabric) of the fabric
facing each other. Place the stitching 9mm (9mm seam allowance) in from the
edge. Stitch down this line two times on each edge. It is good
practice to stitch twice down any seam that needs to be strong. Again its a
little thing that actually makes a difference in the long run. It is difficult
to see in the image since my threads stitched lines are right on top of each
other, but there are actually two stitched lines down each side.
 Add grosgrain down both seamed edges. Cut off and heat seal
each end.
Add grosgrain down both seamed edges. Cut off and heat seal
each end.
 Fold seamed
edges down and stitch in place. Only one stitch is needed here. You will need
to hold the JellyFish open so you can fold the seamed area down and stitch it
flat. When folding spread and fold the seam all the way to the stitched line.
You will need to stretch and hold short segments at a time to work your way down
the seam as the material fights back.
Fold seamed
edges down and stitch in place. Only one stitch is needed here. You will need
to hold the JellyFish open so you can fold the seamed area down and stitch it
flat. When folding spread and fold the seam all the way to the stitched line.
You will need to stretch and hold short segments at a time to work your way down
the seam as the material fights back.
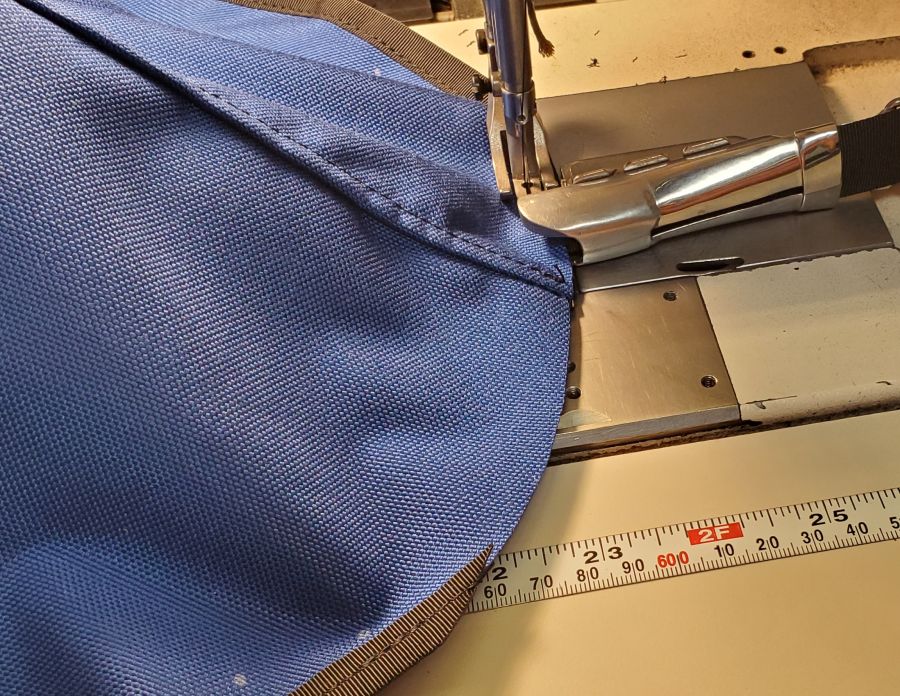
 This is what
the outside looks like with one seam folded flat and stitched down while the
other is not yet folded and stitched. After folding and stitching one
stiched line will be seen on the outside of the JellyFish.
This is what
the outside looks like with one seam folded flat and stitched down while the
other is not yet folded and stitched. After folding and stitching one
stiched line will be seen on the outside of the JellyFish.
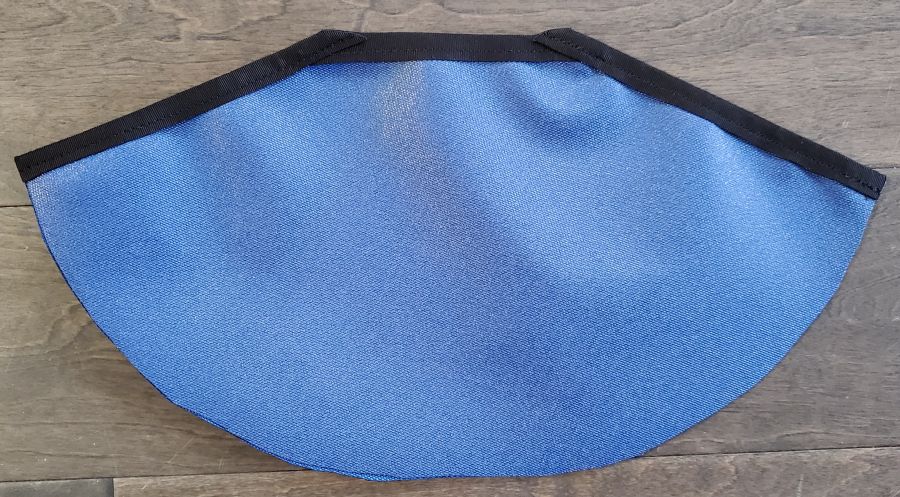
 Add grosgrain
all the way around outer edge.
Add grosgrain
all the way around outer edge.
 When adding the grosgrain to the outer edge, overlap the ends
for clean finish. Remember to heat seal the ends of the
grosgrain after cutting it off.
When adding the grosgrain to the outer edge, overlap the ends
for clean finish. Remember to heat seal the ends of the
grosgrain after cutting it off.
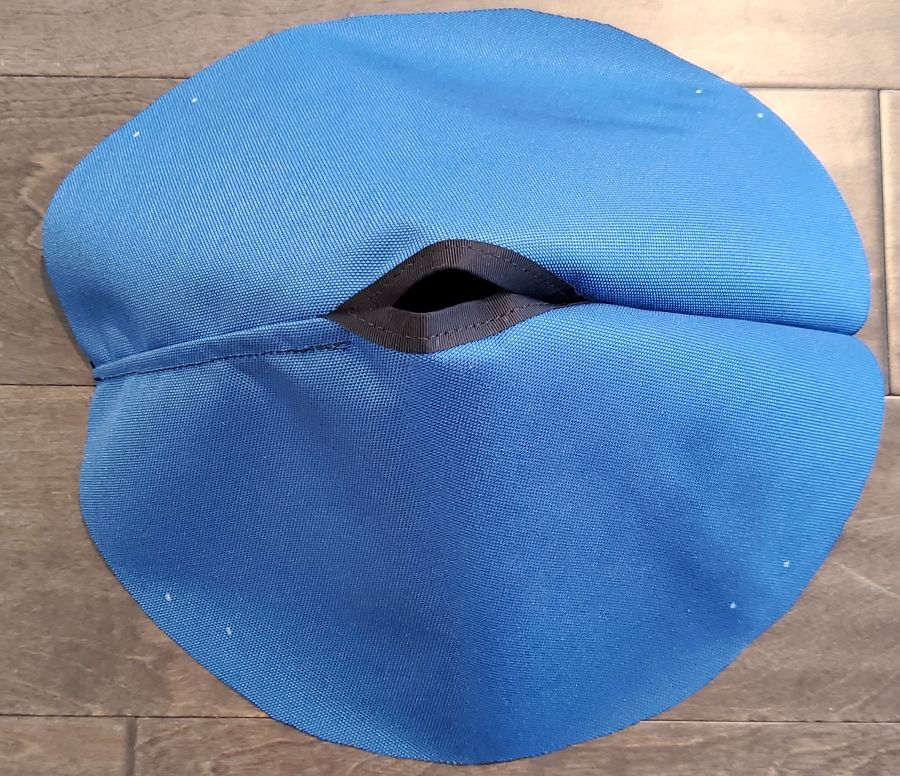
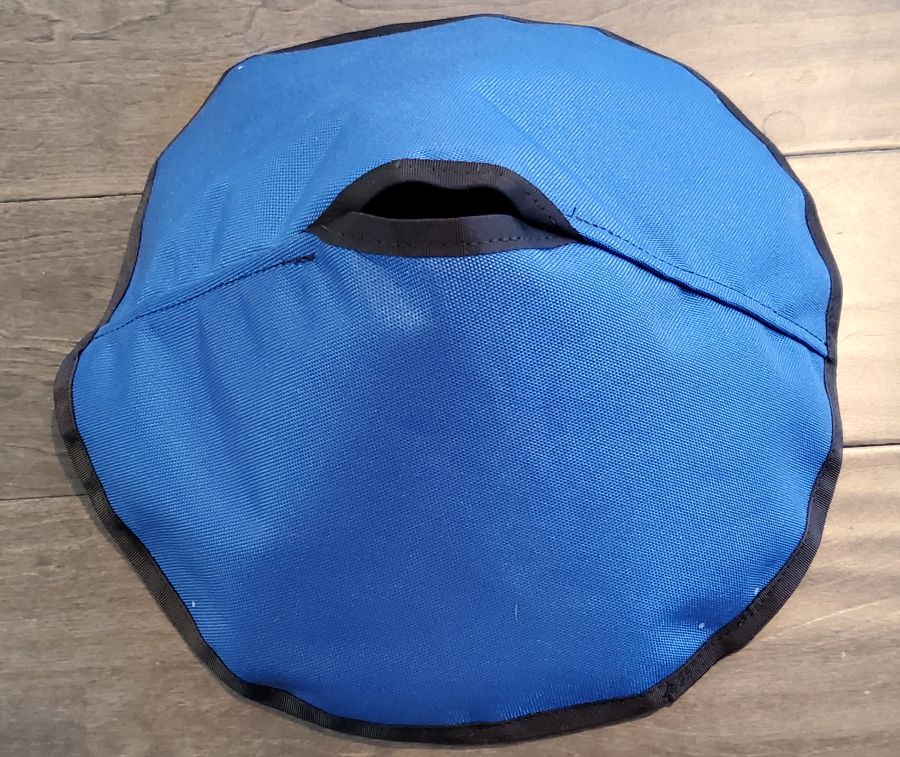 The Body of
the JellyFish is now finished.
The Body of
the JellyFish is now finished.
 If all you wanted was a cone hat to wear for a little shade in the
afternoon, you can stop here.
If all you wanted was a cone hat to wear for a little shade in the
afternoon, you can stop here.
Create JellyFish Tentacles
Do the following for both of the pieces of webbing to form two
individual loops. It is important for the loops to be the
same size when finished.
Note:
I do not have a dedicated bartack machine,
so I do my bartacks with my straight stitch machine by going back
and forth a few times. Ideally a true barracking machine would
be used for good strength. For this reason I add more bartacks
than are likely needed to help make the joined area strong.
The join zone in the loops of webbing have also been moved to the
top of the JellyFish to help with strength. By being at the
top the loops are stitched together below the join zone effectively
reinforcing one another. Being at the top also places the join
zones where the least amount of tensile load is placed on them and
the is less abrasion happening. If I true bartack machine were
used the join zone would likely be stronger allowing a different
placement of the join zone in the finished product making it a
little easier to sew. Some of the difficulties in my
particular process arise from working with the relatively stiff join
zone of the webbing loops being placed at the top of the JellyFish.
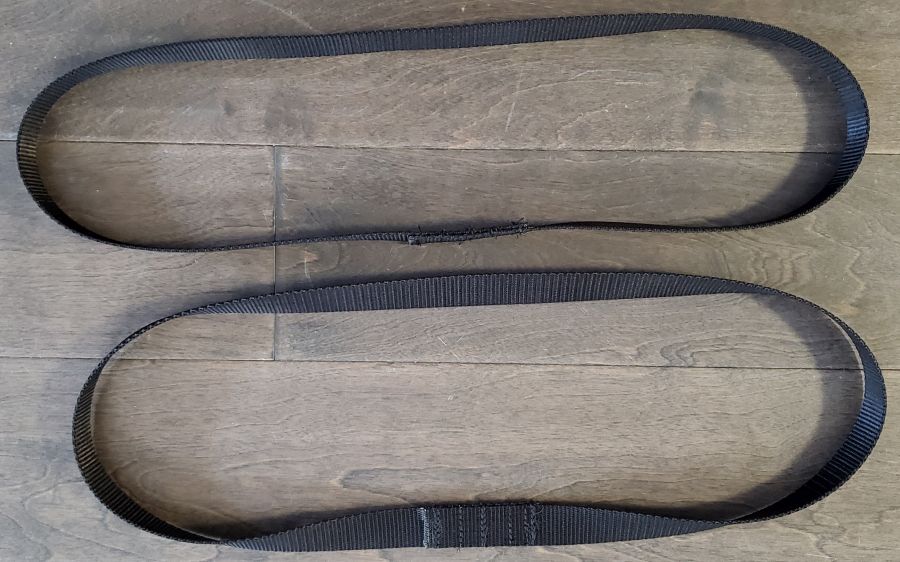 Make a loop out of each piece of webbing with a 70mm overlap zone.
Be
sure the webbing is not twisted so the loop doesn't have any twists
in it.
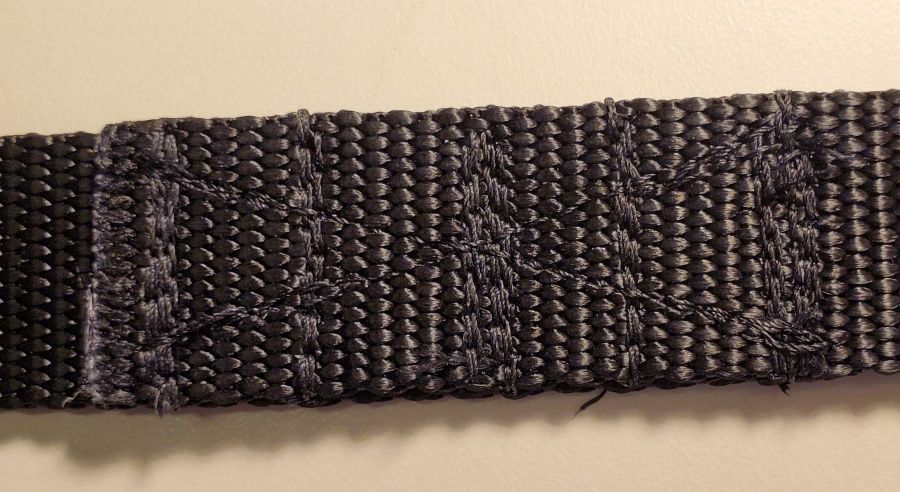 In the 70mm
overlap zone......
In the 70mm
overlap zone......
Bartack the webbing 2 times near each end of the overlap zone.
Bartack the webbing 2 times in the center of the overlap zone.
Bartack 1 time between each end and the center bartack.
Sew an X pattern across the overlap zone by stitching from corner(s)
to corner(s)
Attach the JellyFish Tentacles to the Body
This part can be difficult to do as some of the sewing is in tight
areas. You may need to practice a bit to get this done well.
Very important while performing the next steps is to stretch and
hold webbing and body fabric wrinkle free.
Very important to
also keep the body of the JellyFish folded right side out. Resist
the urge to fold it wrong side out for easier access for sewing. If
you fold the body wrong side out while stitching, unfixable wrinkles
will develop in future steps. The wrinkles will be a result of the
fabric being on the outside of the curve (longer distance to travel)
when stitched in place then being on the inside of the curve
(shorter distance to travel) when the body is flipped back to right
side out.
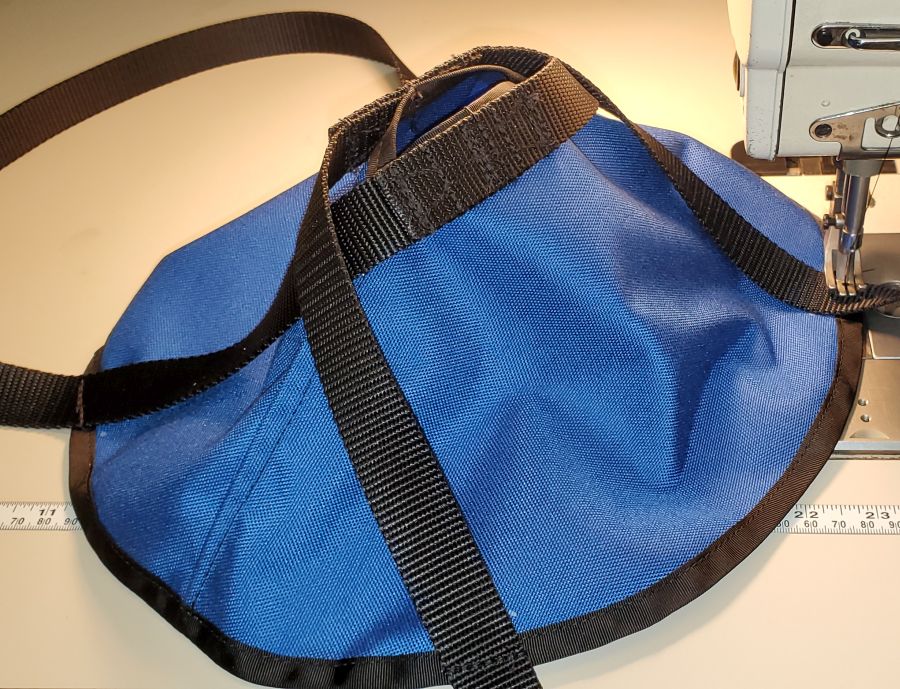
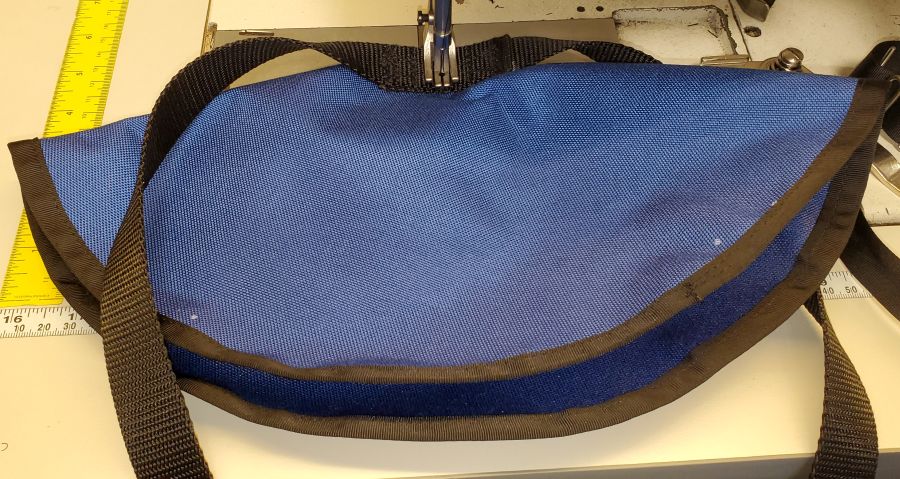 Place join zone of first webbing loop alongside slot and bartack in
place in the center.
Place join zone of first webbing loop alongside slot and bartack in
place in the center.
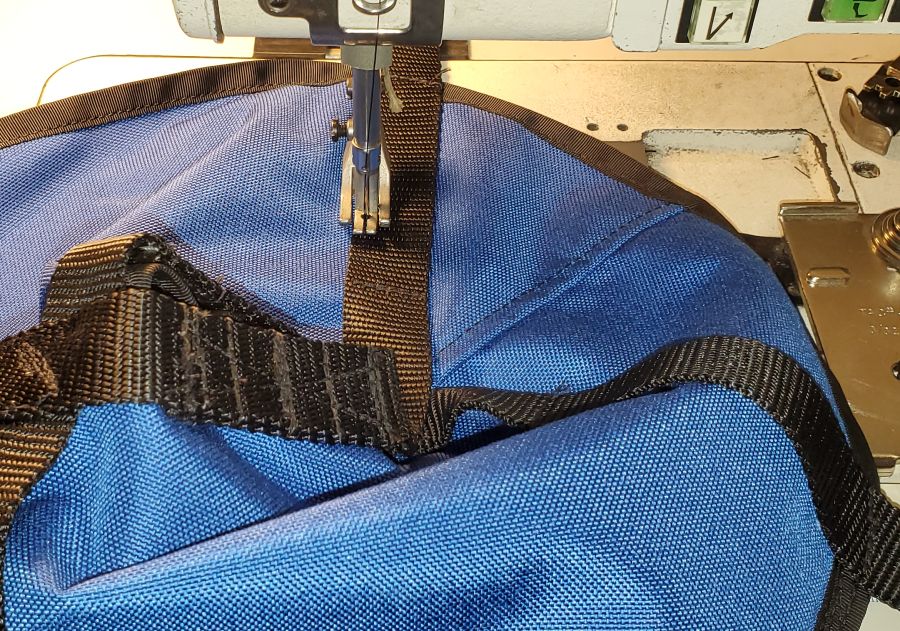
This is a tight space, be careful not to accidentally
stitch slot together. What you don't see in this image
is the unseen portion of the slot pulled away from the sewing area.
 Place join zone of other webbing loop along opposite side of slot
and bartack in place in the center.
Place join zone of other webbing loop along opposite side of slot
and bartack in place in the center.
This is a tight space, be careful not to
accidentally stitch slot together. What you end up with should
look like this. Each webbing loop is bartacked in place at the center
of the slot area with the webbing join zone also centered on the slot area.
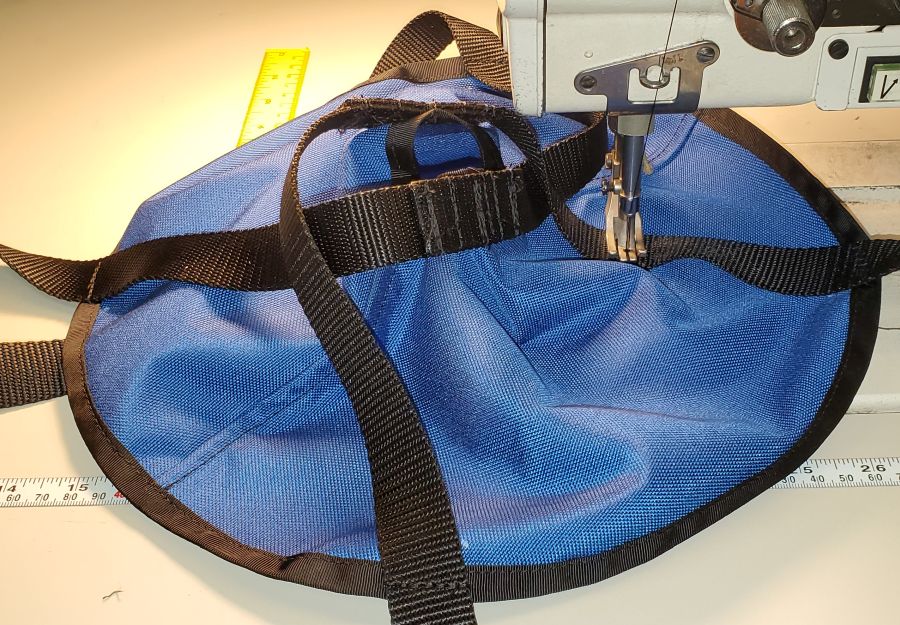
 Bartack webbing at fabric edge on opposite piece of fabric while
positioning the webbing between the alignment marks made with the pattern.
Bartack webbing at fabric edge on opposite piece of fabric while
positioning the webbing between the alignment marks made with the pattern.
Notice the white dots next to webbing, these are the alignment dots.
Webbing
will angle across the body joining seam and approach fabric edge at
an angle.
Repeat for each of the 4 tentacles so that each one is attached near
the fabric edge.
Before placing the JellyFish in the sewing
machine, the fabric and webbing were stretched tight from center bartack to
fabric edge then squeezed tight to hold the webbing in the correct spot.
If you do not do this you may have a lot of excess wrinkle to deal with.
Note
how each tentacle wraps around the slot and attach to the fabric on the opposite
side.
Note - Important:
Be sure not to have loose end
of the tentacles form a cross over pattern. The end result should
be free hanging loops that do not cross or interfere with one
another. To do this, be sure webbing A crosses over the top of
webbing B on both ends of the slot.
 Bartack
webbing to fabric half way between slot and fabric edge.
Bartack
webbing to fabric half way between slot and fabric edge.
Repeat for each of the 4
tentacles.
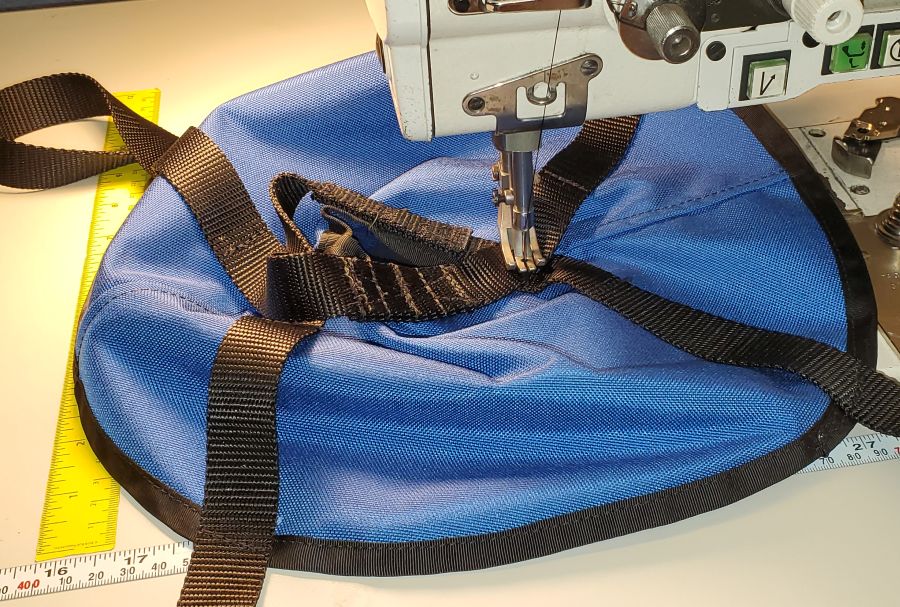 Bartack both
pieces of webbing to the fabric at
both ends of the slot.
Bartack both
pieces of webbing to the fabric at
both ends of the slot.
You will be stitching through both pieces
of webbing and the fabric.
You will need to push the JellyFish flat
but try not to turn it fully wrong side out.
Do this at both ends
of the slot.
 After all 4
tentacles are bartacked.
After all 4
tentacles are bartacked.
Stitch along both sides of webbing from fabric
edge to the slot.
Go all the way up through where the webbing loops cross over.
Near the end of the stitch you will also be stitching
through 2 layers of webbing and the fabric.
Do this for all 4 tentacles
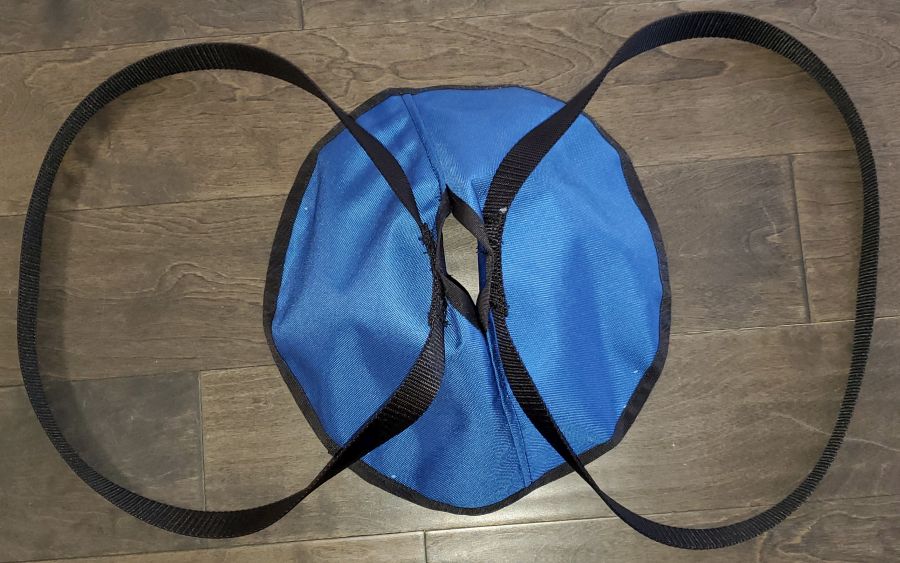
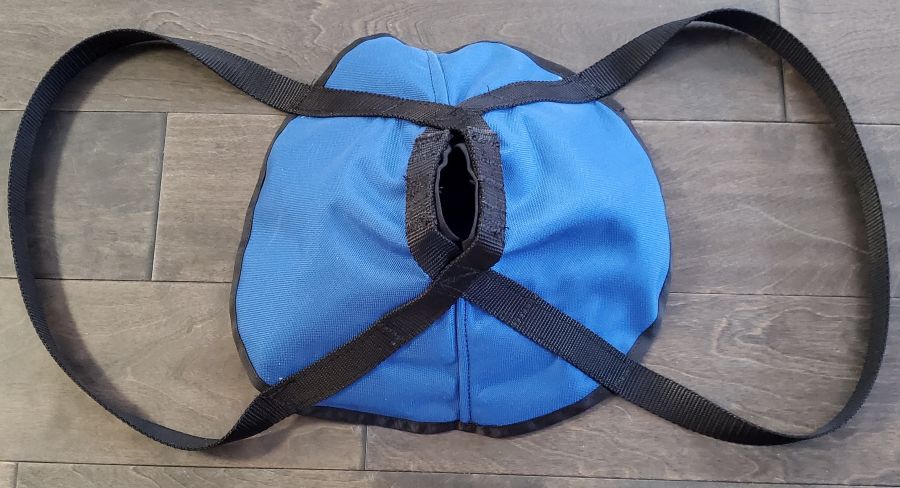 When finished
your JellyFish should look like this. Note that the tentacles are not
crossed and do not interfere with one another in any way. If your are
crossed you overlapped the loops the wrong way up by the slot.
When finished
your JellyFish should look like this. Note that the tentacles are not
crossed and do not interfere with one another in any way. If your are
crossed you overlapped the loops the wrong way up by the slot.

Your JellyFish is complete. Or you could just use it as a hat
with wind straps.