Canyoneering Route Description
BFS Canyon - 4A X II
Escalante National Monument, Utah.
10-27-19, 5 people, 1 Day (Travel time in route 8 hours)
 Time includes upclimbing lower brimstone (The Beast) then overland to and
down BFS.
Time includes upclimbing lower brimstone (The Beast) then overland to and
down BFS.
Time Required - 3.5 to 5 hours
Distance - 2.6 miles Total, 0.3 miles Technical
Rappels - 0 Rappels, Longest Rappel N/A feet.
(bring a couple 50 foot ropes though - see general comments
below)
Elevation Range - 4710 - 4520 Feet
Shuttle Required - No Vehicle - High Clearance, 4WD if bad road conditions
Permit Required - No
Two short ropes of about 50 feet, 20 feet webbing. Some people find
a #5 Black diamond cam helpful to place in the down canyon end of the
BFS (we did not use it).
BFS Canyon (aka Kelsey's Tightest Slot) is a tiny X canyon
that packs a punch in both the fun and difficulty categories. The BFS Canyon
name comes from there being a Big Freaking Silo to cross (BFS = Big Freaking
Silo).
Do not let the short technical length fool you, BFS
Canyon has a some difficult obstacles suited more for the experienced
canyoneer. The Big Freaking Silo that is the name sake of the canyon is a
serious challenge as well as one other silo a little farther down canyon.
Other portions of BFS Canyon are relatively straight forward stemming,
galumphing and crossing moderate silos while 50 plus feet off the deck.
While it is short in length, BFS Canyon is not well suited for those new to
X canyon.
BFS Canyon got the technical rating of 4 due to
advanced rope work needed to cross the BFS. While there are no mandatory rappels in the canyon, it
is best to bring a couple 50 foot ropes to assist one another with the BFS
and another obstacle farther down canyon. A short length of webbing
can be used on a small arch at the up canyon end of the BFS to assist in
belaying people. the arch is small and semi fragile. DO NOT pull
rope through the arch! Someone has already done this and it has
grooved the arch enough that it is losing integrity. Another rope or 2
pulled through this arch will likely damage the arch to the point it can no
longer be trusted at all. Use and leave a small piece of webbing tied
to the arch if you use it. This arch is small and even a Smooth
Operator or Fiddle Stick rigging can groove the rock.
Thanks to Anthony for going through this canyon a
second time to show us the place.
WARNING!! This is an X Canyon:
There are potentially deadly situations with no way to add protection.
When that happens, friends or gear are of no use... You truly are "on your
own" (with an audience). Do not attempt an X canyon until you are
proficient with sustained high stemming and confident with your technical
abilities including advanced anchors, ascending, pot hole escape and partner
assists. Information about X canyons is of little use if you lack
skills or experience. Making a mistake at the wrong time can kill.
Drop into an X canyon.... "At Your Own Risk".
Ultimately you are responsible for your own actions.
Where terrain allows, a rim team can be a safety net and moral support.
Unfortunately terrain rarely allows for such a luxury.
WARNING!!
To get to the Trailhead
From the city of Escalante drive about 4 miles southeast on Hwy
12 to the turn off for Hole-In-The-Rock road on the right (extHoleInRock). The condition
of the dirt Hole in the Rock road
varies
a lot with recent rains and road maintenance. High clearance
may be needed in extreme cases but most of the time passenger
cars will be fine for the first 30 or 40 miles on Hole in the
Rock road.
Travel about 26 miles southeast on
Hole-In-The-Rock road to the turn off for the Dry Fork trailhead
to the left (extDryForkTH1). From Hole-In-The-Rock road drive about 0.8 miles
to a fork in the road (extDryForkTH2) and stay right (east) at
the fork. After staying right (east) at the fork you are
on an un-named road to an un-named TH about 1.5 miles away.
Along the un-named road there are a few places to camp.
About 0.8 miles in from the fork the road gets deeper with sand
and has more rough rock making passenger cars a bad idea.
Just as the road gets rougher and has more sand there is a small
not well used slickrock pull out on the left where you can park
(PkDryFrkAlt1) if you only have a passenger car.
If you have high clearance and possibly 4WD continue east about
0.7 miles to the end of the road and a large parking area
(jDryForkAlt1).
To leave the Exit Vehicle / Escape Pod
No exit vehicle is needed. This is done as an out and back
route.
GPS coordinate information listed at the bottom. For information about waypoint naming and map symbols, refer to the
Glossary page.

Click the links for maps of the route.
Map of the drive overview into the trailhead.
Map of the last part of the drive into the trailhead.
Map of the approach.
Map of the technical section and the way up to the top.
The Approach:
From
the parking area
(PkDryFrkAlt1) walk east
on rolling slickrock
with some gentle
sandstone hills on the
left (north) and a very
wide shallow drainage
beginning to form on the
right (south). As
the drainage deepens,
keep left staying just
up out of the drainage
(the drainage will be
forming on your right or
south side).
About 0.35 miles from
the trailhead is a spot
(DryFrkAlt01) where you
will see where you can
see a drop of about 30
feet in the wash to the
right (south) and some
hoodoo like peaks on the
left (north). To go BFS
Canyon, follow down
along the rim of the
wash with the 30 foot
drop on your right
(south) and some small
hoodoo like peaks on
your left (north).
About 0.5 miles farther
the drainage you were
following ends where it
dumps into Dry Fork
(jDryForkAlt3). To
go down to BFS Canyon,
turn right and walk
south down Dry Fork.
About 0.3 miles south
down Dry fork is the
bottom of BFS drainage (jBFSBt)
where it dumps into Dry
Fork. Walk north-ish up
BFS for about 200 feet
looking for a ramp
running up next to a
crack on the nose
(BFS01-AprUP) on the
right (east) side.
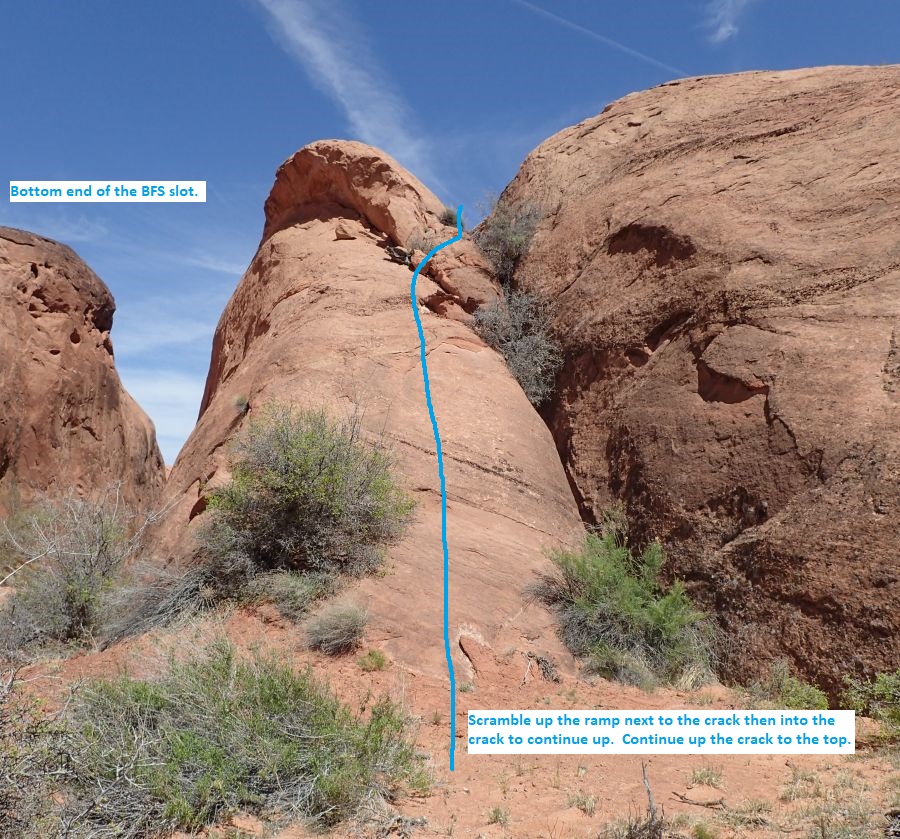
From the bottom of the
crack (BFS01-AprUP)
scramble up the ramp
just to the left of the
crack. A short distance
up the ramp, work your
way into the crack
continuing up a short
distance to then
continue up more ramp on
the left (west) side of
the crack.
A little over 200 feet
farther you will be near
the top of the ramp
(BFS02), stay left
toward BFS Canyon to go
around the left (west)
side of a rock feature
then out to open
slickrock.
Once out on rolling
slickrock, route find
north-ish roughly
following the rim of BFS
on your left (west) for
about 0.35 miles to
where you can easily
walk down into wide open
sandy wash above the BFS
slot. Walk down
into the wide open sandy
wash above the narrow
technical section
(yBFS-Tp).
The Canyoneering / Technical Section:
Once in the open
sandy wash (yBFS-Tp)
turn left and walk south
down canyon in shallow V
slot that continues to
get deeper.
About 500 feet farther
the canyon pinches down
(BFS-20) where you can
choose to begin stemming
and galumphing or
scramble up on the LDC
(east) side rim.
Scrambling up on the LDC
rim provides easy travel
next to the now deep and
very narrow slot. If you
decide to stay in
canyon, you will cross a
wide silo then soon be
forced up to the rim
anyway as the canyon
becomes too narrow to
stay in.
About 330 feet farther
the canyon begins to
widen (BFS-21) and
deepen forcing you to
begin stemming down
canyon. A few feet into
the stemming is a medium
width silo with featured
walls making it easy to
cross over just before
reaching the BFS.
A short distance farther
is the Big Freaking Silo
(BFS-22-TheBFS) which
which appears to be over
60 feet deep (we could
not actually see the
bottom) and too wide to
cross over. At the up
canyon end of the BFS is
a small arch on the RDC
side wall where webbing
can be set for a rappel
or handline down into
the silo. One person can
get down into the crack
up canyon of the small
arch to back up the
anchor and provide belay
as needed.
Note:
One way to
cross the silo is, rig a
webbing loop for rope on
the small arch and
rappel or downclimb
about 8 feet to a small
ledge. The downclimb is
very exposed and is best
done using an awkward
arm bar. Once on the
ledge, lean out to
bridge over the silo
placing hands on the
down canyon side then
climb over and up into
the crack on the down
canyon side. The bridge
is not wide but is
exposed and the climb
into the crack on the
down canyon side is awkward making a
belay from the small
arch comforting. The
first person across the
BFS can then use a rope
to assist in belaying
other across from the
ledge. The rope from the
webbing on the small arch can then be
pulled from the down
canyon side. You
did use webbing on the
arch, right? See
next note.
Note:
DO NOT
place rope
directly around the
arch. Pulling rope
through this small arch
will cut it rendering it
useless for future
parties. If you use the
arch for an anchor,
ALWAYS tie a loop of
webbing on it and leave
it there. This arch is
small and even a Smooth
Operator or Fiddle Stick
rigging can groove the
rock. If this arch is
compromised, an anchor
can be set using a chock
stone anchor or
JellyFish in the crack
on the up canyon side.
Using the crack anchor
sets the rope lower and
will make entry to the
BFS more difficult.
Note:
Some people have
found a #5 Black diamond
cam useful in setting in
the down canyon crack
but we did not use it.
Right after BFS is a
moderately wide silo to
easily stem over
followed by stemming
over multiple smaller
silo like features where
you will be 30 to 50
feet off the deck.
About 120 feet down
canyon of the BFS is a
wide silo (BFS-22) that
very tall people can
stem over the top with
high penalty points if
they fall. Most people
will need to awkwardly
downclimb about 15 feet
into the silo where they
can stem over it at a
lower level. Downclimb
into the silo is
exposed, very awkward
and intimidating. A rope
can be helpful if an
anchor point can be
found or if someone is
willing provide a meat
anchor then downclimb
last without the rope.
After crossing the
lower, level you will
need to climb up the
other side which can be
awkward and exposed as
well. Small people can
get into a crack and
climb up with little
exposure. Average to
larger sized people will
need to climb up a
slightly overhung
section since they will
not fit in the crack.
The next 250 feet of
canyon after this silo
is a mix of galumphing,
stemming and crossing a
few silos that are well
featured and not as
difficult. You will be
40 to 50 feet off the
deck at various places
in this section.
As you near the end of
the canyon (BFS-23) look
for a way to downclimb
about 25 feet down into
one of a few gapers to
the sandy floor below.
Note:
If sand levels
are low you can
downclimb to the floor
then belly crawl in sand
for about 100 feet under
pinch points to exit. If
sand levels are high you
will need to continue
stemming down canyon
down canyon about 60
feet to find another way
to downclimb in. A good
idea is to provide a
meat anchor for someone
to go check the lower
exit before committing
the entire group.
Shortly down canyon the
walls widen (yBFS-Bt) to
a wide sandy corridor.
The Exit:
From
where the walls widen (yBFS-Bt)
walk the sandy floor
about 0.2 miles down to
Dry Fork (jBFSBt).
Once at Dry Fork (jBFSBt)
turn right and walk west
up the wide Dry Fork
drainage for about 0.3
miles to a smaller side
wash on the left (west).
At the smaller side
drainage (jDryForkAlt3)
route find your way west
away from the main Dry
Fork drainage up this
sandy wash. About 300
feet up the wash is a
barbed wire fence. Cross
under or over the fence
then up onto slickrock
on the right (northeast)
side to continue west
toward the trailhead.
About 0.5 miles farther
is you will be on the
rim of a drainage next
to the 30 foot drop
(DryFrkAlt01).
Continue west about 0.35
miles back to the
parking spot
(jDryForkAlt1).
Downloadable GPX files
available at
BG-Gear Store
(easier than manual entry and a great way to support
Bluugnome).
Waypoint naming convention and map symbol information can be found on the Glossary page.
Elevations are approximate.
BEFORE
manually entering coordinates set your system to WGS84 datum and Lat/Lon hddd.ddddd° coordinate format.
Inconsistent datum's and coordinate formats will result in location errors.
Click to show / expand the list of waypoints below........
| BFS (1) - Drive to Trailhead |
- extHoleInRock
Lat/Lon (WGS84): N 37.72769
W -111.53143
Elev: NaN Feet
Turn off to Hole-In-The-Rock road from Hwy 12.
- exHarrisWash
Lat/Lon (WGS84): N 37.60644
W -111.42794
Elev: NaN Feet
Turn off to Harris Wash Road to the east.
- extEgypt
Lat/Lon (WGS84): N 37.54114
W -111.36176
Elev: 5,279 Feet
Turn off to the Egypt Road to the east (left on the drive in on Hole in the Rock road..
- extDryForkTH1
Lat/Lon (WGS84): N 37.46638
W -111.22344
Elev: 4,890 Feet
Turn off of Hole-In-The-Rock road toward Dry Fork trailhead. BLM road 252
This is about 25 miles down Hole in the Rock road.
- extDryForkTH2
Lat/Lon (WGS84): N 37.46579
W -111.21226
Elev: 4,849 Feet
Junction where road 252 goes left (north) to Dry Fork trailhead. Continuing straight (east) follows Kane County Road K9315 to an un-named TH about 1.5 miles away. About 0.8 miles in on road K9315 the road has deeper sand and more rough rock making passenger cars a bad idea.
- PkDryFrkAlt1
Lat/Lon (WGS84): N 37.46631
W -111.19895
Elev: 4,772 Feet
The road begins to get rougher and have deeper sand. This slick rock pull out is about as far as you want to push a passenger car into this road. High clearance with 4WD will get you about 0.7 miles farther up the road to the preferred parking spot.
- jDryForkAlt1
Lat/Lon (WGS84): N 37.46342
W -111.18670
Elev: 4,710 Feet
Park here at an un-named tailhead on an un-named road as an alternate entry to the Dry Fork drainage.
To go to ROC or Brimstone Canyons,..........
To go to Sandslide or BFS Canyons, Walk east on rolling slickrock with some gentle sandstone hills on the left (north) and a very wide shallow drainage starting to form on the right (south). As the drainage deepens, keep left staying just up out of the drainage (the drainage will be forming on your right or south side).
|
| BFS (2) - Approach |
- jDryForkAlt1
Lat/Lon (WGS84): N 37.46342
W -111.18670
Elev: 4,710 Feet
Park here at an un-named tailhead on an un-named road as an alternate entry to the Dry Fork drainage.
To go to ROC or Brimstone Canyons,..........
To go to Sandslide or BFS Canyons, Walk east on rolling slickrock with some gentle sandstone hills on the left (north) and a very wide shallow drainage starting to form on the right (south). As the drainage deepens, keep left staying just up out of the drainage (the drainage will be forming on your right or south side).
- DryFrkAlt01
Lat/Lon (WGS84): N 37.46203
W -111.18043
Elev: NaN Feet
A spot on the LDC rim of a wash next to a drop of about 30 feet in the wash.
If going to BFS Canyon or down Dry Fork, follow down along the rim of the wash with the 30 foot drop on your right (south) and some small hoodoo like peaks on your left (north).
If going to Sandslide Canyon or up Dry Fork start wrapping left (north) around the hoodoo like peaks and route find your way northeast.
- jDryForkAlt3
Lat/Lon (WGS84): N 37.46202
W -111.17263
Elev: 4,520 Feet
One of the routes from the alternate Dry Fork TH meets Dry fork here.
To go down to BFS Canyon, turn right and walk south down Dry Fork.
To back to the trailhead, route find your way west away from the main Dry Fork drainage up this sandy wash. About 300 feet up the wash is a barbed wire fence. Cross under or over the fence then up onto slickrock on the right (northeast) side to continue west toward the trailhead.
- jBFSBt
Lat/Lon (WGS84): N 37.46120
W -111.16871
Elev: 4,510 Feet
Bottom of BFS drainage where it dumps into Dry Fork.
To go to the top of BFS, walk north-ish up BFS for about 200 feet looking for a ramp running up next to a crack on the nose on the right (east) side.
To go back to the parking and trailhead after BFS Canyon, turn right and walk west up the wide Dry Fork drainage for about 0.3 miles to a smaller side wash on the left (west).
- BFS01-AprUP
Lat/Lon (WGS84): N 37.46165
W -111.16896
Elev: NaN Feet
The bottom of BFS slot meets wide open sand and there is a ramp and crack running up the nose on the east side. To go to the top of BFS, scramble up the ramp just to the left of the crack. A short distance up the ramp, work your way into the crack continuing up a short distance to then continue up more ramp on the left (west) side of the crack.
- BFS02
Lat/Lon (WGS84): N 37.46213
W -111.16854
Elev: NaN Feet
As you get near the top of the ramp, stay left toward BFS Canyon to go around the left (west) side of a rock feature then out to open slickrock. Once out on rolling slickrock, route find north-ish roughly following the rim of BFS on your left (west) for about 0.35 miles to where you can easily walk down into wide open sandy wash above the BFS slot.
- yBFS-Tp
Lat/Lon (WGS84): N 37.46671
W -111.16505
Elev: 4,630 Feet
Top of BFS lower technical section (aka Kelsey's Tightest Slot).
Walk south down canyon in shallow V slot that continues to get deeper.
|
| BFS (3) - The Canyon |
- yBFS-Tp
Lat/Lon (WGS84): N 37.46671
W -111.16505
Elev: 4,630 Feet
Top of BFS lower technical section (aka Kelsey's Tightest Slot).
Walk south down canyon in shallow V slot that continues to get deeper.
- BFS-20
Lat/Lon (WGS84): N 37.46584
W -111.16633
Elev: NaN Feet
Canyon pinches down where you can choose to begin stemming and galumphing or scramble up on the LDC (east) side rim. Scrambling up on the LDC rim provides easy travel next to the now deep and very narrow slot. If you decide to stay in canyon, you will cross a wide silo then soon be forced up to the rim anyway as the canyon becomes too narrow to stay in.
- BFS-21
Lat/Lon (WGS84): N 37.46502
W -111.16692
Elev: NaN Feet
The canyon begins to widen and deepen forcing you to begin stemming down canyon. A few feet into the stemming is a medium width silo with featured walls making it easy to cross over just before reaching the BFS.
- BFS-22-TheBFS
Lat/Lon (WGS84): N 37.46490
W -111.16698
Elev: NaN Feet
This Big Freaking Silo (BFS) appears to be over 60 feet deep ( we could not actually see the bottom) and too wide to cross over. At the up canyon end of the BFS is a small arch on the RDC side wall where webbing can be set for a rappel or handline down into the silo. One person can get down into the crack up canyon of the small arch to back up the anchor and provide belay as needed.
Note: One way to cross the silo is, rig a webbing loop for rope on the small arch and rappel or downclimb about 8 feet to a small ledge. The downclimb is very exposed and is best done using an awkward arm bar. Once on the ledge, lean out to bridge over the silo placing hands on the down canyon side then climb over and up into the crack on the down canyon side. The bridge is not wide but is exposed and the climb into the crack on the downcanyon side is a bit awkward making a belay from the small arch comforting. The first person across the BFS can then use a rope to assist in belaying other across from the ledge. The rope from the webbing on the small arch can then be pulled from the down canyon side. You did use webbing on the arch, right? See next note.
Note: DO NOT place rope directly around the arch. Pulling rope through this small arch will cut it rendering it useless for future parties. If you use the arch for an anchor, ALWAYS tie a loop of webbing on it and leave it there. This arch is small and even a Smooth Operator or Fiddle Stick rigging can groove the rock. If this arch is compromised, an anchor can be set using a chock stone anchor or JellyFish in the crack on the up canyon side. Using the crack anchor sets the rope lower and will make entry to the BFS more difficult.
Note: Some people have found a #5 Black diamond cam useful in setting in the down canyon crack but we did not use it.
Right after BFS is a moderately wide silo to easily stem over followed by stemming over multiple smaller silo like features where you will be 30 to 50 feet off the deck.
- BFS-22
Lat/Lon (WGS84): N 37.46456
W -111.16710
Elev: NaN Feet
Wide silo that very tall people can stem over the top with high penalty points if they fall. Most people will need to awkwardly downclimb about 15 feet into the silo where they can stem over it at a lower level. Downclimb into the silo is exposed, very awkward and intimidating. A rope can be helpful if an anchor point can be found or if someone is willing provide a meat anchor then downclimb last without the rope. After crossing the lower, level you will need to climb up the other side which can be awkward and exposed as well. Small people can get into a crack and climb up with little exposure. Average to larger sized people will need to climb up a slightly overhung section since they will not fit in the crack.
The next 250 feet of canyon after this silo is a mix of galumphing, stemming and crossing a few silos that are well featured and not as difficult. You will be 40 to 50 feet off the deck at various places in this section.
- BFS-23
Lat/Lon (WGS84): N 37.46388
W -111.16714
Elev: NaN Feet
Look for a way to downclimb about 25 feet down into one of a few gapers to the sandy floor below. If sand levels are low you can downclimb to the floor then belly crawl in sand for about 100 feet under pinch points to exit. If sand levels are high you will need to continue stemming down canyon down canyon about 60 feet to find another way to downclimb in. A good idea is to provide a meat anchor for someone to go check the lower exit before committing the entire group.
- yBFS-Bt
Lat/Lon (WGS84): N 37.46355
W -111.16752
Elev: 4,560 Feet
Bottom of BFS where skinny slot ends and opens up to large corridor. Walk the sandy floor about 0.2 miles down to Dry Fork.
|
| BFS (4) - Exit |
- yBFS-Bt
Lat/Lon (WGS84): N 37.46355
W -111.16752
Elev: 4,560 Feet
Bottom of BFS where skinny slot ends and opens up to large corridor. Walk the sandy floor about 0.2 miles down to Dry Fork.
- jBFSBt
Lat/Lon (WGS84): N 37.46120
W -111.16871
Elev: 4,510 Feet
Bottom of BFS drainage where it dumps into Dry Fork.
To go to the top of BFS, walk north-ish up BFS for about 200 feet looking for a ramp running up next to a crack on the nose on the right (east) side.
To go back to the parking and trailhead after BFS Canyon, turn right and walk west up the wide Dry Fork drainage for about 0.3 miles to a smaller side wash on the left (west).
- jDryForkAlt3
Lat/Lon (WGS84): N 37.46202
W -111.17263
Elev: 4,520 Feet
One of the routes from the alternate Dry Fork TH meets Dry fork here.
To go down to BFS Canyon, turn right and walk south down Dry Fork.
To back to the trailhead, route find your way west away from the main Dry Fork drainage up this sandy wash. About 300 feet up the wash is a barbed wire fence. Cross under or over the fence then up onto slickrock on the right (northeast) side to continue west toward the trailhead.
- DryFrkAlt01
Lat/Lon (WGS84): N 37.46203
W -111.18043
Elev: NaN Feet
A spot on the LDC rim of a wash next to a drop of about 30 feet in the wash.
If going to BFS Canyon or down Dry Fork, follow down along the rim of the wash with the 30 foot drop on your right (south) and some small hoodoo like peaks on your left (north).
If going to Sandslide Canyon or up Dry Fork start wrapping left (north) around the hoodoo like peaks and route find your way northeast.
- jDryForkAlt1
Lat/Lon (WGS84): N 37.46342
W -111.18670
Elev: 4,710 Feet
Park here at an un-named tailhead on an un-named road as an alternate entry to the Dry Fork drainage.
To go to ROC or Brimstone Canyons,..........
To go to Sandslide or BFS Canyons, Walk east on rolling slickrock with some gentle sandstone hills on the left (north) and a very wide shallow drainage starting to form on the right (south). As the drainage deepens, keep left staying just up out of the drainage (the drainage will be forming on your right or south side).
|